

Embedding Your Assistant
Embedding
Upon creating your assistant, you'll be taken back to the Assistant Dashboard. To embed your assistant onto a page, click the three dots on the side and click Edit, like so:

At the bottom of the page, you should see the following embed block. By adding this code to a page, your assistant will be fully functional and accessible.
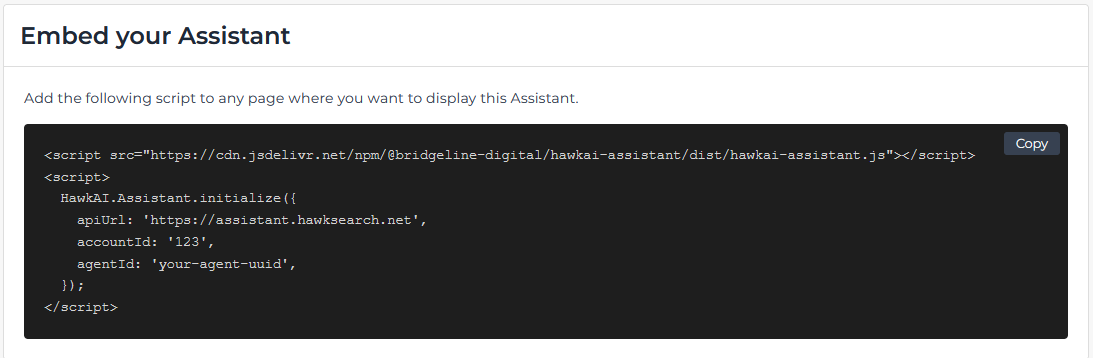
Where to add Embed Code?
Add the embed code to the footer of your site. This can be done through Google Tag Manager or directly in your code base.
Customization
Customization doesn't have to be limited from the Configuration screen. The Assistant is fully customizable within the embed, and any settings added into the embed will override those enabled within the Configuration screen.
The following is an example of an assistant with its UI experience fully coded within the embed. Note: All features added this way have to be wrapped in the ui:{} class. For information about the variables and which configuration feature they correspond to, please look in Configuring Your Assistant for more information.
HawkAI.Assistant.initialize({
  apiUrl: 'https://assistant.hawksearch.net',
  accountId: '123',
  agentId: 'your-agent-uuid',
  ui: {
    open: true,
    display: 'window',
    position: 'right',
    allowFullScreen: true,
    allowFileUpload: true,
    heading: 'Support Assistant',
    logoUrl: 'https://example.com/logo.png',
    initialMessage: 'Hi! How can I help you today?',
    promptOptions: ['What are your best deals?', 'Track my order', 'Return an item'],
    placeholder: 'Type your question…',
    showDisclaimer: true,
    disclaimer: 'Responses are AI-generated and may not be accurate.',
    theme: 'auto',
    colors: {
      primary: {
        default: '#2563eb',
        hover: '#1d4ed8',
      },
    },
    styles: '.hawkai-assistant__window { border-radius: 16px; }',
  },
});
Custom Styling
The widget's Shadow DOM prevents host-page styles from bleeding in, but you can target widget internals using the stable BEM class names exposed on every element:
| Class | Element |
|---|---|
.hawkai-assistant__trigger | The floating action button |
.hawkai-assistant__trigger--open | Modifier applied when the widget is open |
.hawkai-assistant__window | The chat panel container |
.hawkai-assistant__header | The panel header bar |
.hawkai-assistant__message | Individual message bubbles |
.hawkai-assistant__form | The message input area |
.hawkai-assistant__disclaimer | The disclaimer text below the input |
Tools
Tools let the model take actions on your page. Each tool has a name, a description (for the model), a JSON schema for its inputs, and an execute function the widget calls when the model invokes it.
The format of Tools are like so:
interface Tool<TInput, TOutput> {
  name: string;
  description: string;
  inputSchema: {
    type: 'object';
    properties: Record<string, unknown>;
    required?: string[];
  };
  execute: (input: TInput, options?: { signal?: AbortSignal }) => Promise<TOutput>;
  render?: (data: RenderToolData<TInput>, helpers: RenderToolHelpers) => AsyncRenderToolResult;
}
execute receives an optional options.signal (an AbortSignal) as its second argument. The signal aborts when the user stops the response; long-running tools may pass it to fetch (or otherwise observe it) to cancel in-flight work. Ignoring it is fine for synchronous or fast tools.
Hello World Example
Basic example showing off how to use JavaScript for your tool
<!-- HawkAI Site Assistant — custom tool skeleton: alert popup -->
<script src="https://cdn.jsdelivr.net/npm/@bridgeline-digital/hawkai-assistant/dist/hawkai-assistant.js"></script>
<script>
HawkAI.Assistant.initialize({
  apiUrl: 'https://assistant-prod.hawksearch.net',
  accountId: 'e3141',
  agentId: '428bea83-cd00-449b-a025-a7d67fb6f689',

  tools: [
    // A tool is: name, description, inputSchema, execute.
    {
      name: 'show_alert',
      description: 'Shows an alert popup on the page. Use when the user asks to be shown or warned about something on screen.',
      inputSchema: {
        type: 'object',
        properties: {
          message: { type: 'string', description: 'The text to show in the popup.' },
          severity: { type: 'string', description: 'How urgent the request is to show' }
        },
        required: ['message','severity']
      },
      execute: async function (input) {
        alert(input.severity + ': ' + input.message);

        return { success: true, placement: 'the alert was shown centered on the top of the screen' };
      }
    }
  ]
});
</script>
Add to Cart Example
Tools are passed within the tools array. Multiple tools can be added within the Tool array. The example below details the Add to Cart tool, which enables an Add to Cart button underneath any products returned by the assistant.
HawkAI.Assistant.initialize({
  apiUrl: '...',
  accountId: '...',
  agentId: '...',
  tools: [
    {
      name: 'add_to_cart',
      description: 'Adds a product to the shopping cart.',
      inputSchema: {
        type: 'object',
        properties: {
          product_name: { type: 'string', description: 'Product name' },
          price: { type: 'string', description: 'Product price (optional)' },
        },
        required: ['product_name'],
      },
      execute: async ({ product_name, price }) => {
        // Your logic here — runs in the browser when the model calls this tool
        addItemToCart(product_name, price);
        return `${product_name} added to cart.`;
      },
    },
  ],
});
Updated 2 months ago