

App Overview
Installation
The process of getting Hawksearch up and running on your site involves the following
- Install Hawksearch app from the BigCommerce Marketplace (Refer to this article on using the marketplace - https://support.bigcommerce.com/s/article/How-do-I-access-and-install-the-new-single-click-apps-within-my-Bigcommerce-store-control-panel?language=en_US)
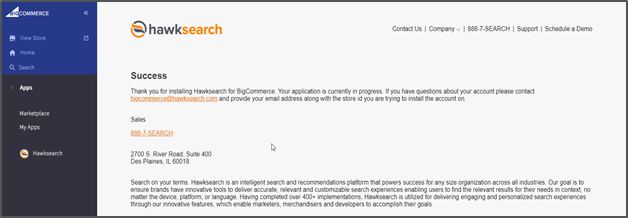
- If the app install goes through successfully you should see the success message below.
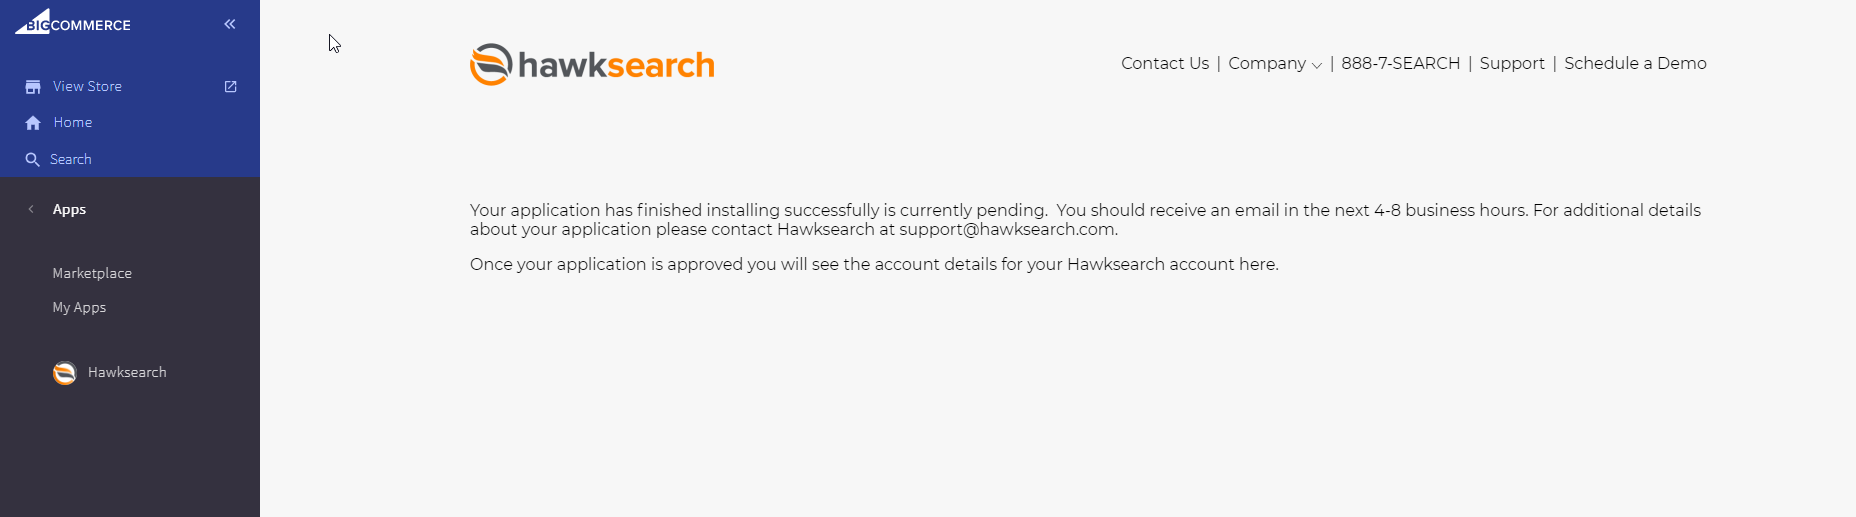
- All app downloads once successful require activation on the Hawksearch platform, Until the installation is approved, the app will stay in pending status. If you try to access the app you will see the message below. Typical approval times for new accounts range from eight to sixteen business hours after the request has been made.
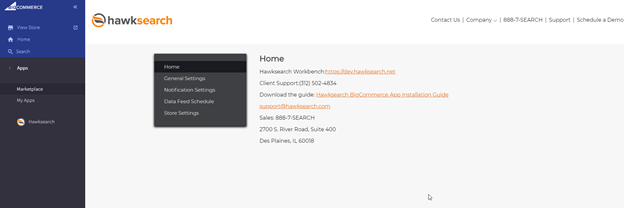
- Once installation has been approved, the home screen of the app will display the Hawksearch Dashboard link you can use to tune the search settings. The username/password for accessing the dashboard will be provided in a separate email to the designated email address specified during installation. Additional settings for managing the data feed generation are provided on the app screens
- Click the "Generate Feed" button manually and ensure that the feeds on the SFTP account specified on the Data Feed Settings screen are refreshed
- Login to the Hawksearch dashboard and click on rebuild index and ensure that index is processed successfully
- Click on your "View Store" link and confirm you can now see Hawksearch active on the site. you should start seeing the Hawksearch autcomplete results show up when you start typing in the search textbox
- Schedule training with Hawksearch by contacting [email protected] or check out the help section for videos and additional documentation on the tool
- If you wish to power your category pages through Hawksearch follow instructions on the Updating Category Theme section.
Home Screen
This screen will provide an overview of the support contact and the link to the Hawksearch dashboard. It will also provide access to the online documentation that comes with Hawksearch application
General Settings Screen
This screen provides an overview of Hawksearch API engine information and data feed details.

- Api Key: This will the unique API key that will be used for your engine and will allow you to connect to the Hawksearch API
- Guid: This is unique tracking key code used for tracking purposes
- Engine Name: This will be the unique name for the site URL you will connect to for your Hawksearch API requests
- SFTP Settings: The app will send data feeds generated from BigCommerce to an FTP location on the Hawksearch side. The remaining settings will provide details of the FTP location. This account is specific to your installation of Hawksearch so files are only accessible to you and the Hawksearch staff working on your account. The app will be sending product data to this FTP location on a scheduled basis as configured in the data feed schedule screen
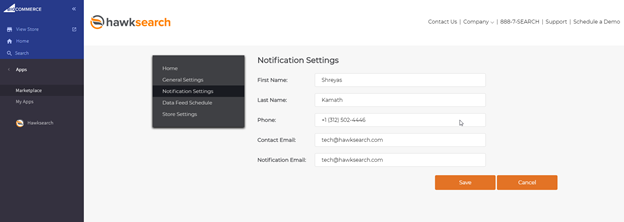
Notification Settings Screen
This section will be initialized on installation with information based on the store profile in BigCommerce. These settings are used for any communication about your account and feed schedule changes. You can choose to edit the information on this screen to disconnect the email address from the store profile and choose a different email address and phone number for communication.
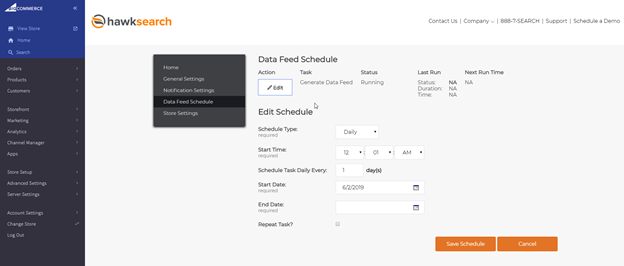
Data Feed Schedule Screen
The Data Feed Schedule section displays the task details, provides the ability to run task on demand, and manage schedule details. Date and time values are displayed in CST time zone.
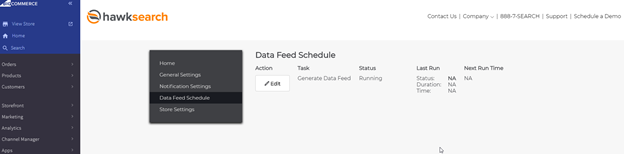
To edit the schedule details, click on the edit icon before the Generate Data Feed text. Clicking on ‘Save Schedule’ will send an email to ‘Notification Email’ value defined in Notification settings.
The last Run time indicates the time task ran last at and the status of the success.
Store Settings Screen
This tab shows the settings for the BigCommerce API version you can use with the plugin to generate data for Hawksearch. In addition, this tab will also highlight if the category pages from BigCommerce should be synced to Hawksearch. In order to enable the front end piece of this functionality please reference next section. The Landing pages setting only affects category pages and does not impact any search functionality

Installing Category Pages
Note
Requires Web Development expertise
This step is only required if you are leveraging Hawksearch for category pages or browse pages. If you are using Hawksearch to replace the BigCommerce search only, the following steps do not need to be completed.
Hawksearch by default uses the JavaScript client-side integration to power the search page for Bigcommerce sites.
Once the app is installed and approved, the search and autocomplete feature from Hawksearch are turned on by default.
However, to drive the products listing feature through Hawksearch for even on other pages ono your site - such as landing pages that are based on categories or brands, the steps below are required to be completed on your admin portal.
Update Theme Files
The default theme’s category.html template will need to be customized to allow for results from Hawksearch to display properly and power the category pages from Big Commerce.
The DIVs will be initially empty, but the inner HTML of these div tags will be injected automatically by Hawksearch on page render.
If you have your BigCommerce storefront theme running locally, simply open the following file in your text editor of choice if you’re running your storefront locally, or by the theme editor section in the control panel (instructions follow).
templates > pages > category.html
Replace the HTML between {{#partial "page"}} and {{/partial}} with the following code:
    <style>
        .sitebody, .hawkmpp, .hawksortby, .hawk-guidedNavWrapper .hawk-groupHeading, .hawk-guidedNavWrapper .hawk-navGroup li a { color: #000; }
    </style>
    <div class="page">
        <aside class="page-sidebar">
            <div id="hawkbannerlefttop"></div>
            <div id="hawkfacets"></div>
            <div id="hawkbannerleftbottom"></div>
        </aside>
        <main class="page-content">
            <div id="hawkbreadcrumb"></div>
            <div id="hawkpagecustomhtml"></div>
            <div id="hawktitle"></div>
            <div id="hawkbannertop"></div>
            <div id="hawktoptext"></div>
            <div id="hawkrelated"></div>
            <div id="hawktabs"></div>
            <div id="hawktoppager"></div>
            <div id="hawkitemlist"></div>
            <div id="hawkbottompager"></div>
            <div id="hawkbannerbottom"></div>
            <div id="hawkbannerbottom2"></div>
            <div id="hawkfirstitem"></div>
            <div id="hawklastitem"></div>
            <div id="hawkexplain"></div>
            <div id="hawksmartbug"></div>
        </main>
    </div>
You can also add this HTML to your theme files without running your theme locally via the BigCommerce Storefront section.
Navigate to your BigCommerce control panel and select “Storefront” from the left menu. On that menu, select “My Themes”. On the My Themes page, click the “Advanced” button that appears on your Current Theme and then select “Edit Theme Files” from the dropdown:
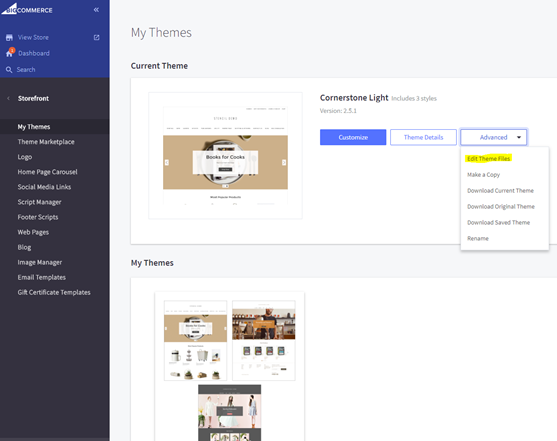
On the Edit Theme Files page, navigate to the category.html template: templates > pages > category.html
In the template file, replace the HTML between {{#partial "page"}} and {{/partial}} with the following code:
    <style>
        .sitebody, .hawkmpp, .hawksortby, .hawk-guidedNavWrapper .hawk-groupHeading, .hawk-guidedNavWrapper .hawk-navGroup li a { color: #000; }
    </style>
    <div class="page">
        <aside class="page-sidebar">
            <div id="hawkbannerlefttop"></div>
            <div id="hawkfacets"></div>
            <div id="hawkbannerleftbottom"></div>
        </aside>
        <main class="page-content">
            <div id="hawkbreadcrumb"></div>
            <div id="hawkpagecustomhtml"></div>
            <div id="hawktitle"></div>
            <div id="hawkbannertop"></div>
            <div id="hawktoptext"></div>
            <div id="hawkrelated"></div>
            <div id="hawktabs"></div>
            <div id="hawktoppager"></div>
            <div id="hawkitemlist"></div>
            <div id="hawkbottompager"></div>
            <div id="hawkbannerbottom"></div>
            <div id="hawkbannerbottom2"></div>
            <div id="hawkfirstitem"></div>
            <div id="hawklastitem"></div>
            <div id="hawkexplain"></div>
            <div id="hawksmartbug"></div>
        </main>
    </div>
Following are the functions of the div tags:
This
This
This
This
This
This
This
This
This
This
This
This
This