

Magento LL 2.x
Proxy Extension Installation Guide
Installation: Please follow the below steps.
Composer Artifact type installation
- Create a new directory “modules” outside the magento application root (typically /var/www/magento). These instructions use /var/www/modules. Please adjust to your local environment.
- Place the attached “zip” files directly in the modules folder (do not unzip).
- In the magento application root, edit the “composer.json” file to add an “artifact” repository, or use the composer command:
“composer config repositories.1 artifact ../modules/” - the “repositories” section should look like: (see screenshot below)
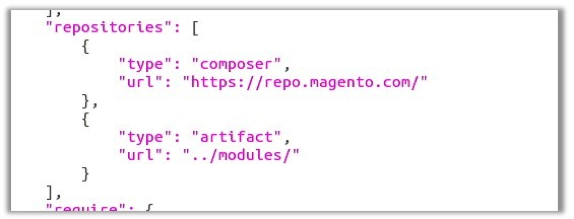
Please adjust based on your local configuration. - With the above “artifact” repo and the 2 zip files in the ../modules/ directory, issue the following composer commands:
composer require hawksearch/datafeed
composer require hawksearch/proxy
composer install (optional)
bin/magento setup:upgrade - Continue with your standard deployment steps (production mode, multiserver, etc)
- Installation Complete
Proxy Hybrid Integration Guide
Overview
This extension will allow you to set up the search page on your store using the Proxy Hybrid Integration method. This will cover installation of the search ahead feature on the search textbox as well as the search page. This extension support multi-store and multi-languages.
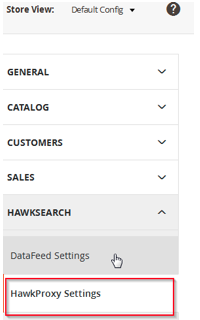
HawkSearch Proxy Settings
Login to admin panel, go to the “Stores” section and click to Configuration in the submenu of store section.
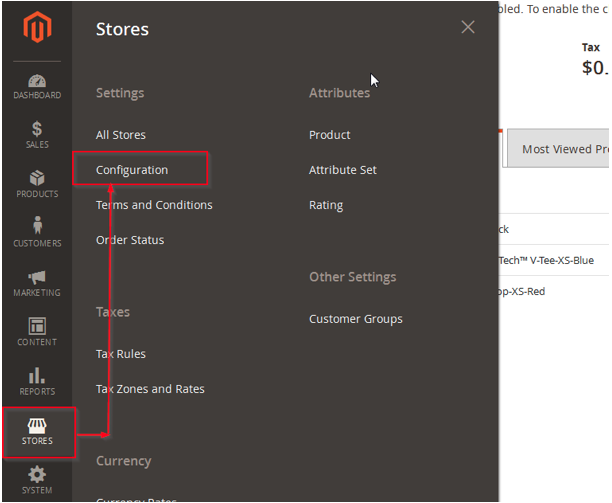
Admin should now see the Hawk Search Configuration options on the Configuration section area.
When Admin, click to HawkProxy Setting than, admin will see the All settings of this extension.
General Settings
Activation
The enabled field indicates if the plug-in has been enabled on the site.
Logging
This setting controlled by the “Enable Logging” field indicates if the error logging has been currently enabled on the plug-in.
Version number
The version number indicates the current version number of the plugin you are using.
Proxy Module Settings
For accessing the Proxy Module configuration section, please click on the “Proxy Module Settings” section.
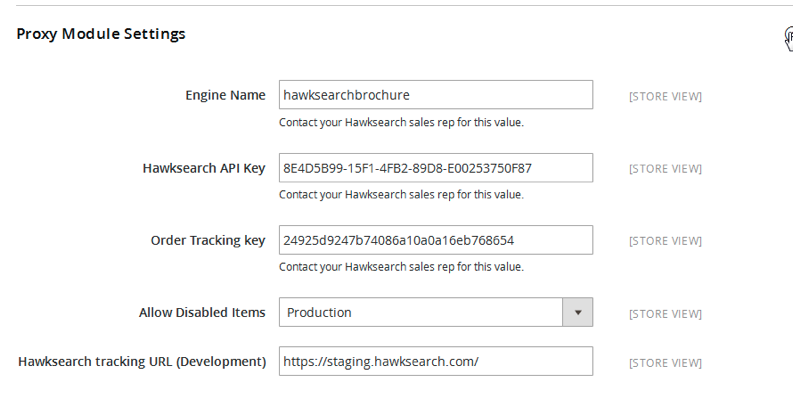
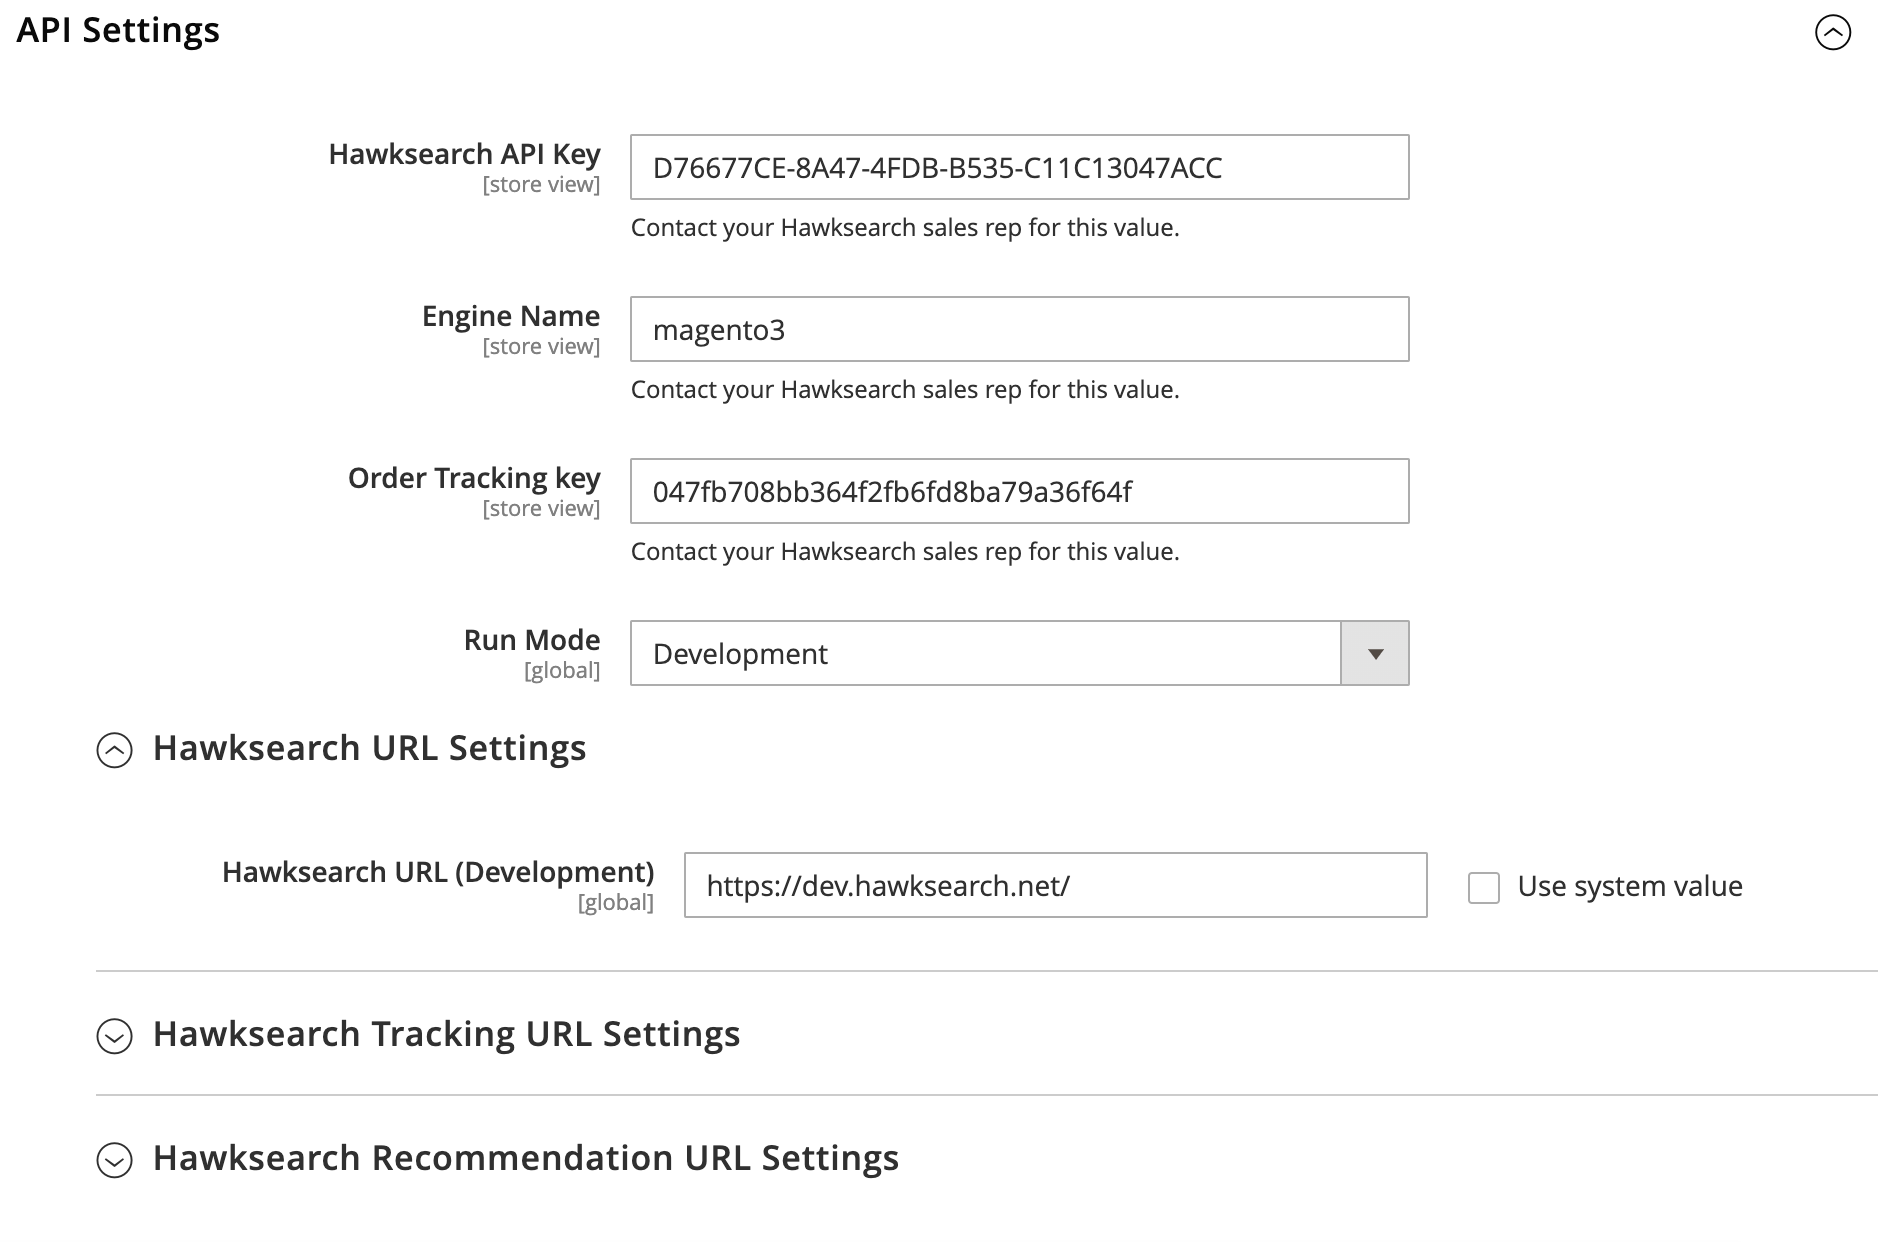
Engine Name
This is the engine name to connect to on the Hawk Search site. This will be provided by your Hawk Search project/account manager.
HawkSearch API Key
This is the API key that is used by the module to connect to Hawk Search Rest API to generate the landing pages. This will be provided by your Hawk Search project/account manager.
Order Tracking Key
This is the identifier used to uniquely identify your account in the image pixel that is added to the order confirmation page on the site to track orders and generate appropriate reports in Hawk Search. This will be provided by your Hawk Search project/account manager.
Run Mode
This indicates if the plugin is currently connected to the staging account or the production account.
Manage Categories
This setting indicates if categories are managed through Hawk Search. Set to “Yes” to allow the Hawk Search Proxy module to manage your category landing pages.
Manage All Categories
This setting indicates if all categories are managed through Hawk Search. If set to “Yes”, Hawk Search landing pages will be used for all categories. If set to “No”, only categories with the “Hawksearch Landing Page” setting set to “Yes” will be managed (set via the Magento “Manage Categories” section on the “General” tab).
Manage Search
This setting indicates that the search is being powered through Hawk Search. See “The Search Box Auto Suggest” below.
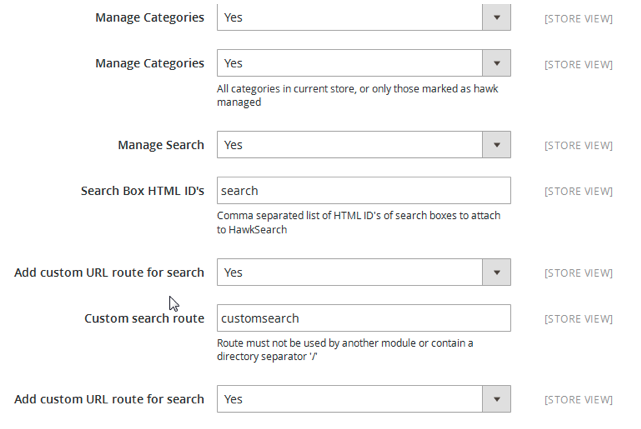
Search box HTML ID’s
This setting should match the Id of the text box for search that is currently used on the header of your Magento site. If your pages use more than one search box, enter the HTML ID’s of each box you wish to attach to the Hawk Search Auto Suggest tool.
Add Custom URL route for search (In development now).
- Set to “No” for production installations.
- Custom search route (in development now).
- Use Category URL Suffix (in development now).
Synchronization Settings
Synchronize Button
This setting allows you to synchronize the categories of our store.
Enable CRON Sync
This setting allows you to enable the CRON job to synchronize categories on a regular basis.
Front end View
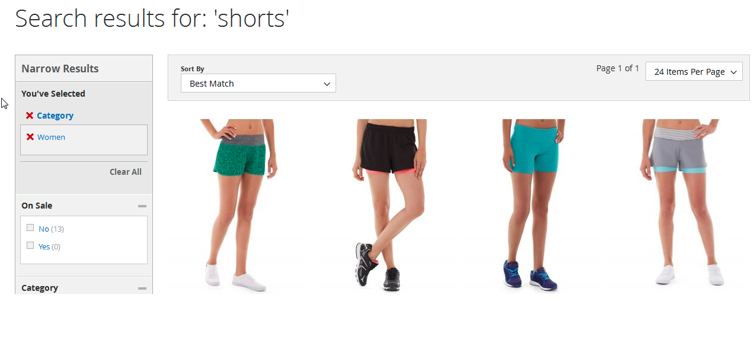
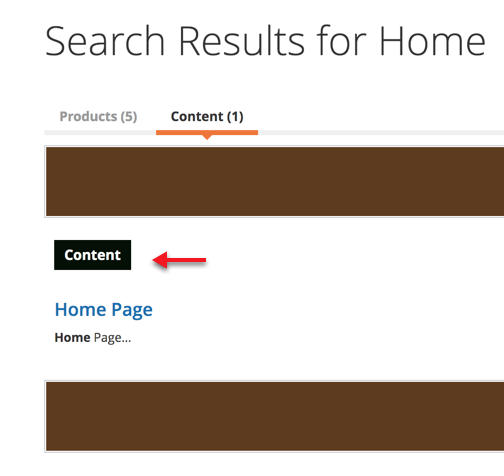
Search bar
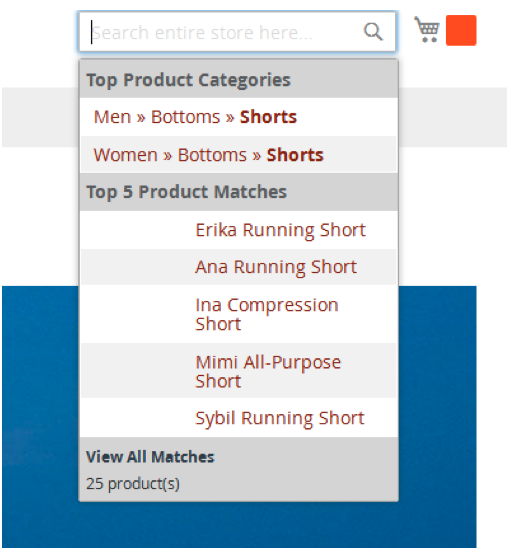
On Search Page

On After Filter
User Manual
Introduction
The Hawksearch service enables online retailers and publishers the ability to drive a rich, compelling user experience. This experience drives visitors to the products and information that they are seeking.
Hawksearch provides the ability to power the product listing pages for categories and brand pages on the site in addition to driving the search page on the site. This document will cover integration between an existing Magento 2 site and Hawksearch to drive: Search Results and Landing Pages.
The Magento 2 plugin allows to set up the data feeds for Hawksearch export. These feeds conform to the guidelines provided in the Hawksearch Data Feed Guidelines.
Requirements and Installation
Configuration
Before Hawksearch can be used with Magento, a Hawksearch account is needed. Having the account, it’s possible to configure the Magento extension to work properly.
Hawksearch Account
Contact you account manager at https://www.hawksearch.com/ and request for an account.
Magento Settings
Note
Some configuration settings are only available on the particular scope. If you don’t see any of the configuration settings please make sure that the proper Scope is selected in the upper-left corner.
To configure the Magento extension, you need the following Hawksearch credentials:
- Engine Name - this is the engine ID associated with your HawkSearch account.
- API Key - it is used by the module to connect to HawkSearch Rest API.
- Tracking Key - it is used to uniquely identify your account in the image pixel that is added to the order confirmation page on the site to track orders and generate appropriate reports in Hawk Search.
You can find these credentials on the Hawksearch Dashboard on the Admin > Account Info tab. Please follow Hawksearch URLs article to find the dashboard URL depending on the Hawksearch environment.
In the administration section of your Magento project, navigate to Stores > Configuration > HAWKSEARCH and fill in the form in the Connection Settings tab with all the information required.
Domains
Hawksearch has three environments available: Development, Staging/Test and a load-balanced Production. When performing integration, each engine can be accessed by using appropriate domains. In most cases it doesn’t require to change default values of URL settings.
Hawksearch URL Settings
- Hawksearch URL (Development): <https://dev.hawksearch.net/>
- Hawksearch URL (Staging): <https://test.hawksearch.net/>
- Hawksearch URL (Production): <https://yourenginename.hawksearch.com/> Provided at time of launch. OR dashboard-na.hawksearch.com
Hawksearch Tracking URL Settings
- Hawksearch tracking URL (Development): <https://tracking-dev.hawksearch.net/>
- Hawksearch tracking URL (Staging): <https://tracking-test.hawksearch.net/>
- Hawksearch tracking URL (Production): <https://tracking-na.hawksearch.com/>
Hawksearch Recommendation URL Settings
- Hawksearch recommendation URL (Development): <https://recs-dev.hawksearch.net/>
- Hawksearch recommendation URL (Staging): <https://recs-test.hawksearch.net/>
- Hawksearch recommendation URL (Production): <https://recs-na.hawksearch.com/>
DataFeed Settings
General
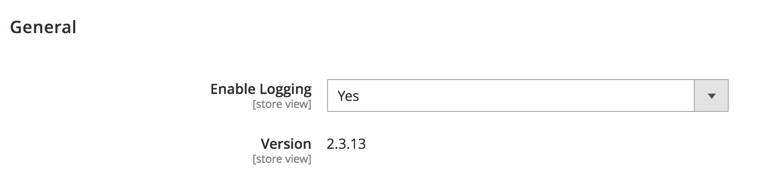
Enable Logging
Enable/Disable logging. Logs are stored in var/log/hawksearch_datafeed.log if the option is enabled.
Version
The version number indicates the current installed version of the module.
Feed Settings

Schedule Feed Generation
This button allows you to generate the feed on demand. Once clicked it adds a Feeds generation cron job to the list of jobs to be processed at the nearest time. Next cron run depends on your Magento cron settings
Note
Setting is available on ‘Store View’ and 'Website' Scopes only.
Feed Stores
This is the list of the sites that is currently installed on your Magento instance. Select the site(s) you need to generate the feeds for. The separate file will be created for each store per each data type. See Data Feeds section for more details
Note
Setting is available on ‘Default Config’ Scope only.
Batch Limit
It is used while processing Feed generation to limit the size of data to be handled during each iteration.
Example
The store has 2500 products, and ‘Batch limit’ is set to 1000. There will be 3 iterations to process all data: 1000 + 1000 +500.
Run Index when Complete
If enabled, it will trigger reindex on the HawkSerch side via API call as soon as Feeds are generated.
Enable Datafeed Cron Task
This setting controls if the cron is enabled to generate the feeds files on a scheduled basis
Cron expression
This setting allows you to specify the cron expression to control the schedule for generating the feeds. Enter a standard 5 part cron expression. See https://en.wikipedia.org/wiki/Cron for more information about cron expressions. Note that the job cannot be scheduled to run more frequently than hourly.
Feed Cron Email
This setting allows you to specify an email address that an email should go out to, once the feed has been generated.
Fileds Mapping
There is an ability to create new Hawksearch fields from Magento configurations page and then map Hawksearch fields to Magento Attributes. The Hawksearch field is created with the setting “Do not store in index?“ set to Yes. Please fine tune the field settings in Hawksearch Workbench after it is created from Magento configuration page. You can find more details about Fields configuration here.
Adding new field
To add new field please scroll down the field list and find Add button at the very end of the list. Fill in “HawkSearch Label“ and “HawkSearch Code“ input boxes and optionally select Magento attribute. You need to Save Config to apply changes.
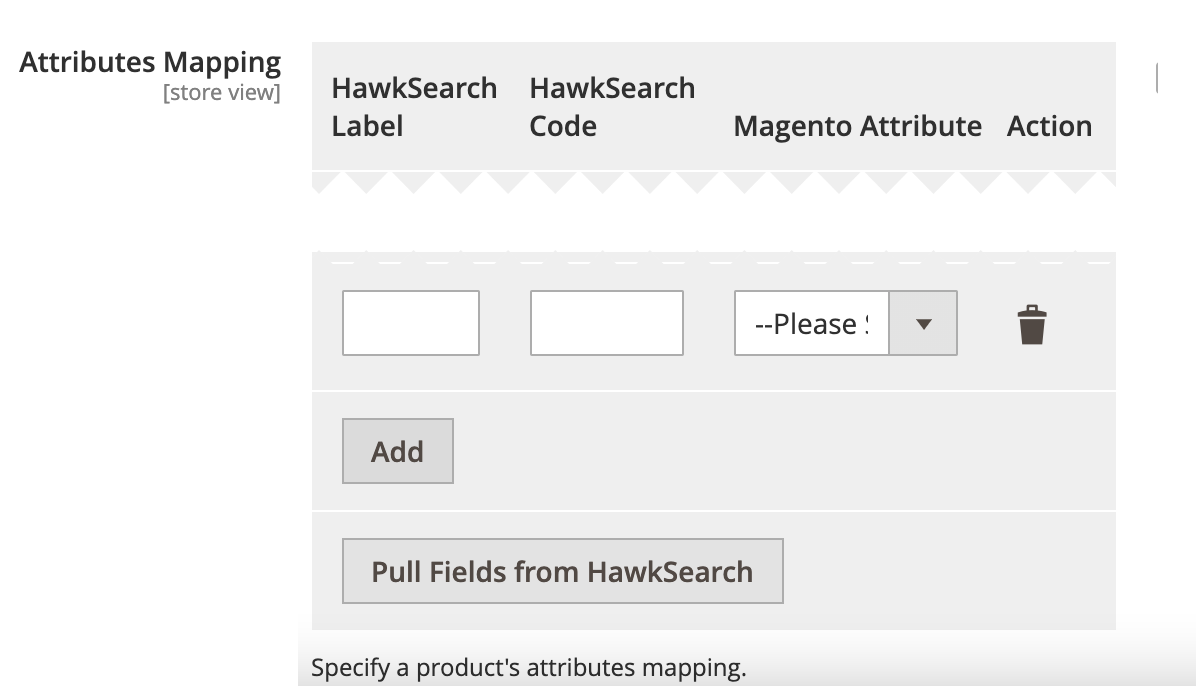
Pulling fields from Hawksearch
To pull all fields created in Hawksearch Workbench push the button “Pull Fields from HawkSerch“. All fields available in HawkSearch will be added on the page. You need to Save Config to apply changes
Note
If field is removed in Hawksearch Workbench when field and corresponding Magento attribute mapping will be removed from Magento Configuration. The exiting mapping will NOT be reset after pulling fields.
Map Hawksearch fields to Magento attributes
If you want to have attribute data appeared in Datafeed this attribute should be mapped to any Hawksearch field. To map Magento attribute to Hawksearch field just select attribute code from the “Magento Attribute“ dropdown list. To remove mapping specify “--Please Select--“ option in “Magento Attribute“ dropdown list. You need to Save Config to apply changes.
There is a “Dedicated method“ option in “Magento Attribute“ dropdown list which is a reserved option for the following Hawksearch field codes:
- url_detail
- group_id
- is_on_sale
- metric_inventory
- category_id
- rating_summary
- reviews_count
Do not use “Dedicated method“ for other fields because it does nothing.
SFTP Settings
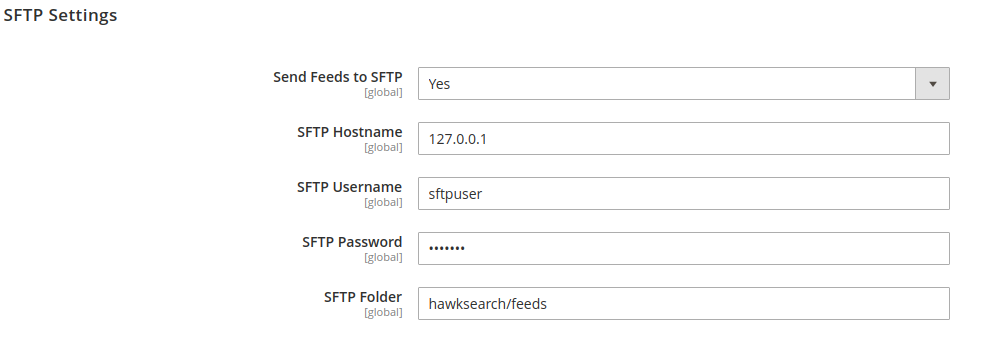
Note
Settings in this section are available on ‘Default Config’ Scope only.
Enable SFTP settings if you want to send your feeds to SFTP server. Please make sure to specify SFTP connection setting correctly.
SFTP Folder is a relative path to your SFTP root directory. Files are sent to SFTP and stored in folders with names of store codes.
HawkProxy Settings
General
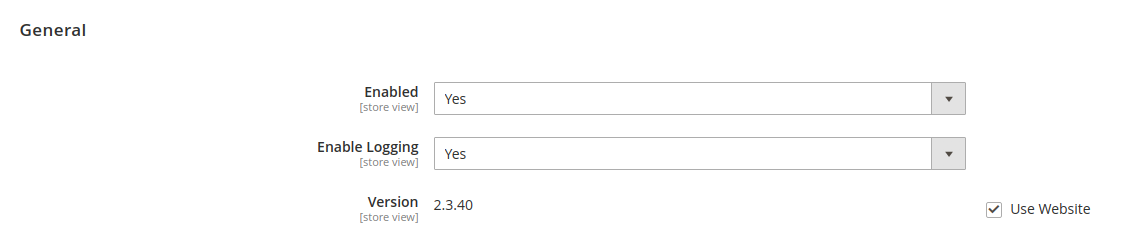
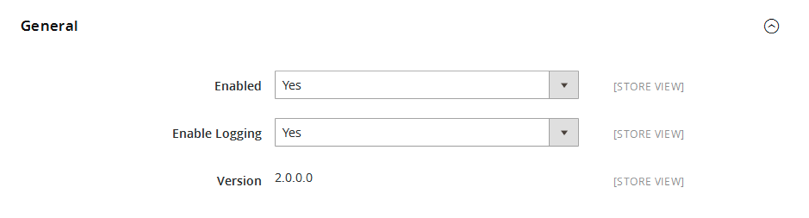
Enabled
The enabled field indicates if the module has been enabled for the current store view.
Note
Setting is available on ‘Store View’ Scope only.
Enable Logging
Enable/Disable logging. Logs are stored in var/log/hawksearch_proxy.log if the option is enabled.
Note
Setting is available on ‘Store View’ Scope only.
Version
The version number indicates the current installed version of the module.
Proxy Module Settings - ‘Store view’ Scope
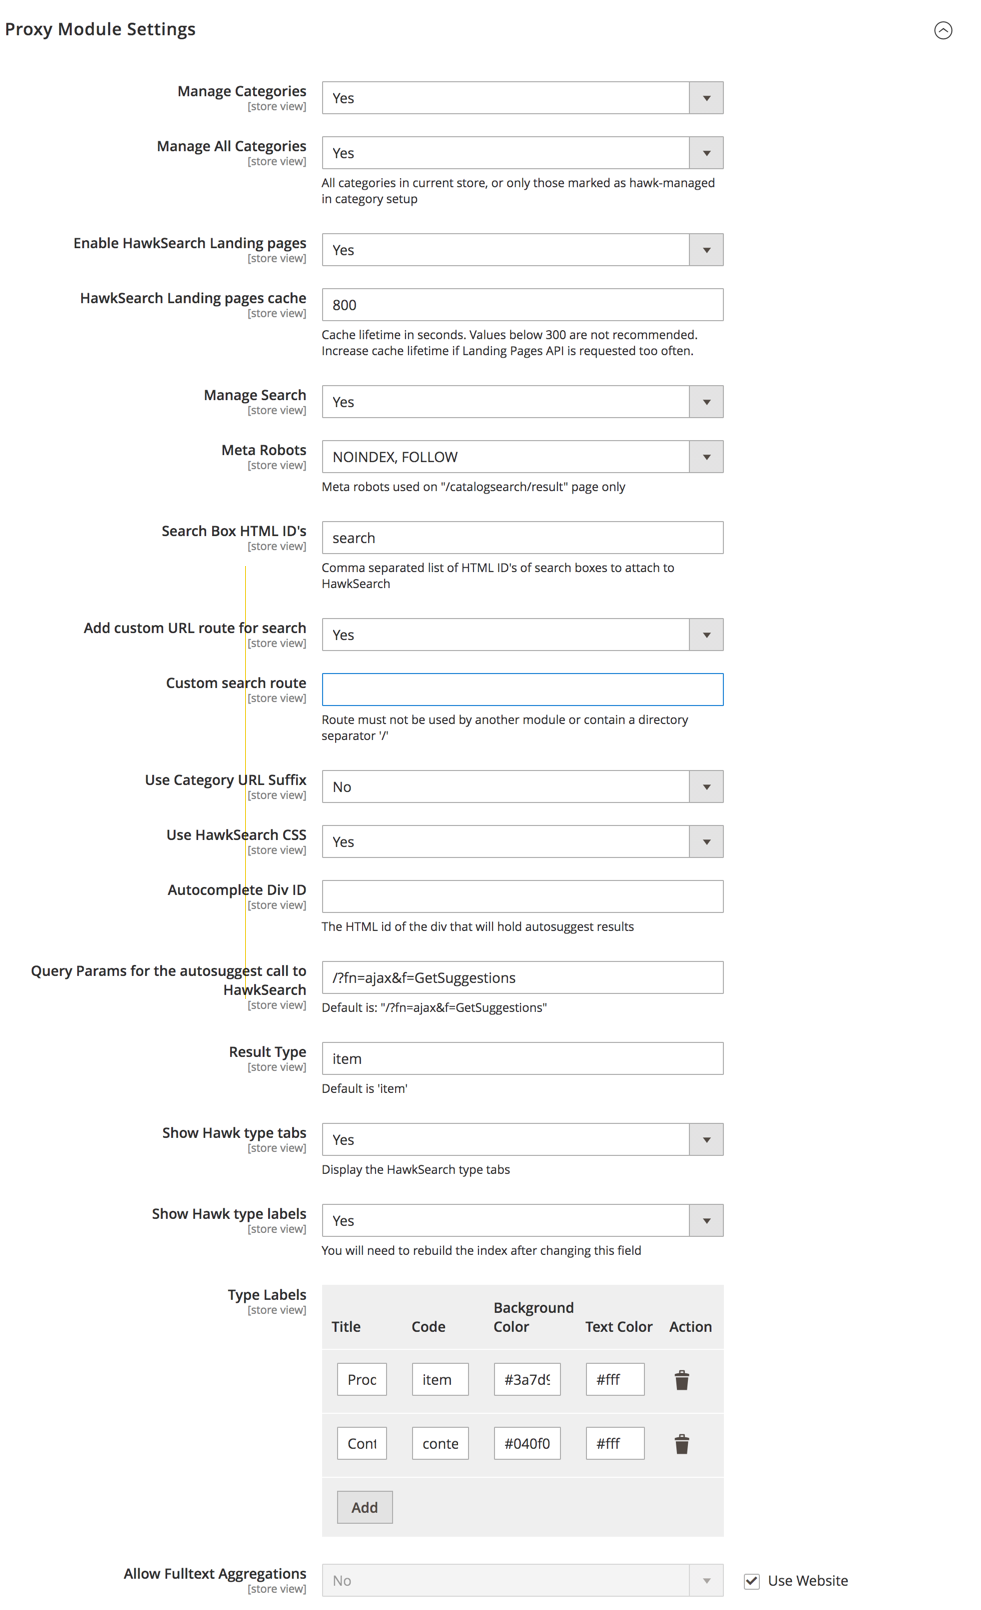
Manage Categories
This setting indicates if categories are managed through Hawk Search. Set to “Yes” to allow the HawkSearch Proxy module to manage your Magento categories as landing pages.
Manage All Categories
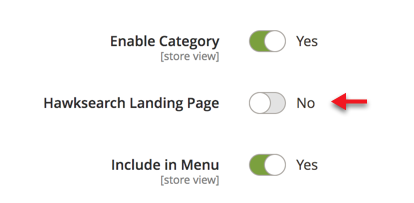
This setting indicates if only specific categories are managed through HawkSearch. If set to “Yes”, HawkSearch landing pages will be created for all categories. If set to “No”, only categories with the “Hawksearch Landing Page” attribute set to “Yes” will be managed. To enable specific category to be manage by HawkSearch as landing page go to Catalog > Categories, pick a category and switch on “Hawksearch Landing Page“ category attribute
Enable HawkSearch Landing pages
This setting indicates whether HawkSearch custom page URLs can be handled by Magento.
HawkSearch Landing pages cache
Cache lifetime in seconds. Values below 300 are not recommended. Increase cache lifetime if Landing Pages API is requested too often.
Manage Search
This setting indicates whether the search is being powered through HawkSearch.
Meta Robots
Meta robots used on "/catalogsearch/result" page
Search Box HTML ID's
This setting should match the Id of the text box for search that is currently used on the header of your Magento site. If your pages use more than one search box, enter the HTML ID’s of each box you wish to attach to the Hawk Search Auto Suggest tool.
Add custom URL route for search
Enables custom route for search results page instead of default "/catalogsearch/result" route
Custom search route
Custom route used for search results page in case when “Add custom URL route for search“ is enabled
Note
Route must not be used by another module or contain a directory separator '/'
Use HawkSearch CSS
Indicates whether external hawksearch.css file should be loaded.
Autocomplete Div ID
The HTML id of the div that will contain autosuggest results
Query Params for the autosuggest call to HawkSearch
It is not recommended to change this setting if you are not aware what does it mean
Result Type
In case when Tabs are enabled for your engine this setting defines the default tab displayed on search results page
Show Hawk type tabs
This setting determines whether tabbed content should be requested from HawkSearch and displayed on search results page

Show Hawk type labels
Display/Hide HawkSearch content type labels
Tabs on search results page
Type Labels
This setting configures content type label mapping. In case if label code is not specified in the setting Title, Background Color and Text Color will be generated
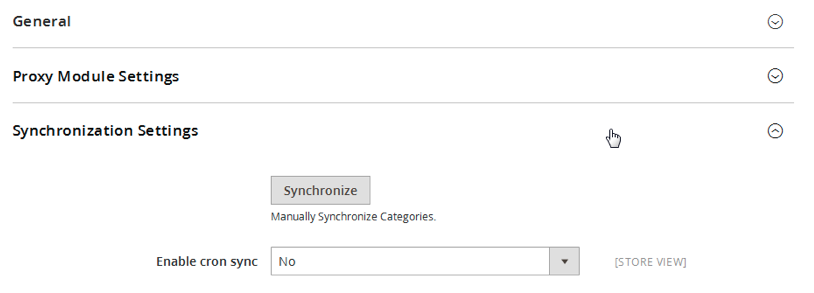
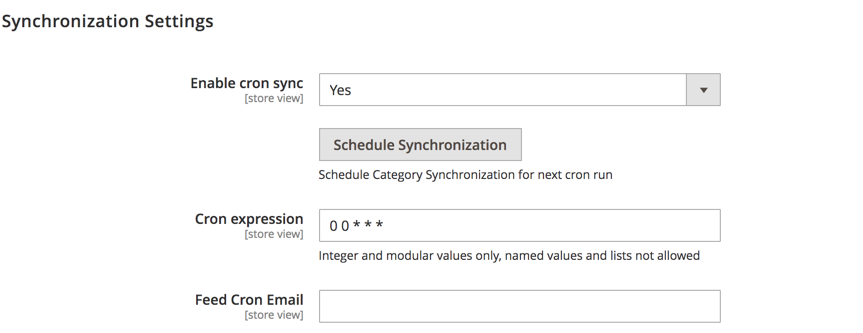
Synchronization Settings
If you are powering the category pages on your Magento site through HawkSearch, this button will launch a background process that will send basic category data (such as the URL and category ID) to the Hawksearch engine for each managed store view. Categories can be managed individually or globally. Note this does not include product data or product/category associations.
Enable cron sync
This setting allows you to enable the cron job to synchronize categories on a regular basis
Schedule Synchronization
This button allows you to schedule categories synchronization on demand. Once clicked it adds a job to be processed by cron at the nearest time. Next cron run depends on your Magento cron settings
Note
Setting is available on ‘Default Config’ Scope only.
For manual categories synchronization there is a CLI command specified:
bin/magento hawksearch:proxy:sync-categories
Cron expression
This setting allows you to specify the cron expression to control the schedule for running the synchronization task. Enter a standard 5 part cron expression. See https://en.wikipedia.org/wiki/Cron for more information about cron expressions. Note that the job cannot be scheduled to run more frequently than hourly.
Feed Cron Email
This setting allows you to specify an email address that an email should go out to, once Categories have been synchronized via the cron job.
Data Feeds
Structure
Files generated by the module are stored in the following folder pub/media/hawksearch/feeds/<store code>. If several stores are enabled for DataFeed module in 'Feed Stores' setting then feed files for each store will be placed in separate folder with unique <store code> as folder name. Magento HawkSearch connector extension supports the following feed files by default:
- items.txt
- attributes.txt
- content.txt
- hierarchy.txt
- timestamp.txt
For more details about Data feed files please refer to Standard Data Feed Requirements for Datafeed-based indexing documentation
Generate Data Feeds
If Magento cron is configured correctly data feeds will be generated automatically. Please make sure that “Enable Datafeed Cron Task” is enabled. The cron job interval is configured according to “Cron expression“. There is an ability to schedule datafeed generation cron job on demand. Please refer to the Schedule Feed Generation button description.
For manual datafeed generation there is a CLI command specified:
bin/magento hawksearch:generate-feed
Patches for Magento LL 2
The list of available patches and their descriptions are available in the repository
Customization
Replace hawksearch.js file
This topic discusses how to use custom hawksearch.js file hosted on Hawksearch server for the purpose of providing custom JS implementations.
We strongly recommend that you do not change the source code of default Hawksearch and Magento components. All customizations must be implemented in custom modules or themes.
Add a custom layout
Place the custom layout file in the following location:
- Your theme layout files:
<theme_dir>/HawkSearch_Proxy/layout. In this case the layout is available in your theme and its child themes.
Create a layout file default.xml, having specified the following:
<page xmlns:xsi="http://www.w3.org/2001/XMLSchema-instance"
      xsi:noNamespaceSchemaLocation="urn:magento:framework:View/Layout/etc/page_configuration.xsd">
    <body>
        <referenceBlock name="head.additional">
            <block class="Magento\Framework\View\Element\Template"
                   name="hawksearch_js_custom"
                   as="hawksearch_js_custom"
                   template="HawkSearch_Proxy::hawksearchjs.phtml"
                   ifconfig="hawksearch_proxy/general/enabled">
                <arguments>
                    <argument name="configViewModel" xsi:type="object">HawkSearch\Proxy\ViewModel\Config</argument>
                </arguments>
            </block>
        </referenceBlock>
    </body>
</page>
Override hawksearch.js source location
Place the custom .phtml file in the following location:
- Your theme templates files:
<theme_dir>/HawkSearch_Proxy/templates.
Create a template file hawksearchjs.phtml. Specify full or minified version of hawksearch.js file in $jsPath variable
<?php
use Magento\Framework\View\Element\Template;
use HawkSearch\Proxy\ViewModel\Config as ConfigViewModel;

/** @var Template $block */
/** @var ConfigViewModel $configViewModel */
$configViewModel = $block->getData('configViewModel');
if (!$configViewModel) {
    return;
}
$jsPath = 'includes/hawksearch';//Use value 'includes/hawksearch.min' for minified file version
?>
<script type="text/javascript">
    (function() {
        var config = {
            paths: {
                "HawkSearch_Proxy/js/hawksearch": "<?= /* @noEscape */ $configViewModel->getHawkUrl($jsPath) ?>"
            }
        };
        require.config(config);
    })();
</script>
Event hooks
The extension’s Javascript library provides a hooking system that allows developers to extend the HawkSearch functionality. At the moment the extensions provides the following hook names for triggering events throughout the front-end implementation:
- processFacetsAfter
To add your hook, use the HawkSearchHooks.register method. This method accepts two parameters: name - a hook name and callback function.
HawkSearchHooks.register('processFacetsAfter', function(json){
    //Add your custom logic here
    return json;
})
The event processFacetsAfter fires as the following:
HawkSearch.triggerHook('processFacetsAfter', json);
The hook transfers the json variable to the callback function where it can be modified and returned back to the calling function.
Add hooks
We strongly recommend that you do not change the source code of default Hawksearch and Magento components. All customisations must be implemented in custom modules or themes.
When you are adding your hooks make sure that it is added before the event is triggered. You should follow the Magento custom JavaScript practices to specify the better approach for customising your store. One of the techniques is to deliver your custom JS file through the head section of theme layout:
<head>
    <script src="Vendor_Module::custom_hooks.js"/>
</head>
The other approach is to add your file with the help of RequireJs.
Disabling jQuery plugins
The hawksearch.js bundle comes with the set of jQuery plugins.
HawkSearch.loadPlugins = jQuery.extend({
    jQueryUI: true,
    slider: true,
    wNumb: true,
    matchHeights: true,
    blockUI: true,
    imagesLoaded: true,
    jQueryCookie: true,
    indexOf: true,
    webUIPopover: true,
    debounce: true,
    slick: true,
    numeric: true,
    waitForImages: true,
    alertify: true
}, HawkSearch.loadPlugins);
Depending on your store theme or custom implementations some plugins may be not needed or conflicted. And you can disable this plugins through the addition of some customisation to your store theme.
Update your theme layout with the following code:
<referenceContainer name="before.body.end">
        <block class="Magento\Framework\View\Element\Template" name="hawksearch_proxyfooter_extended"
                as="hawksearch_proxyfooter_extended" after="hawksearch_proxyfooter" template="Vendor_Module::hawksearch-footer-ext.phtml"
                ifconfig="hawksearch_proxy/general/enabled">
        </block>
</referenceContainer>
Contents of the hawksearch-footer-ext.phtml file
<script type="text/javascript">
HawkSearch.loadPlugins = HawkSearch.loadPlugins || {
            imagesLoaded: false
        };
</script>
In this example we are disabling the imagesLoaded plugin.
Replace hawksearch.css file
Sometimes it is reasonable to use different hawksearch.css file or avoid loading it from Hawksearch server. For example, to use minified version of CSS hawksearch.min.css.
We strongly recommend that you do not change the source code of default Hawksearch and Magento components. All customisations must be implemented in custom modules or themes.
Override hawksearch.css source location
Override view/frontend/templates/hawksearch/proxy/head/js.phtml file with the custom one in current theme folder. Copy original template and place the copy in the following location:
<theme_dir>/HawkSearch_Proxy/templates/hawksearch/proxy/head/js.phtml.
Replace this peace of code
$configViewModel->getHawkUrl('includes/hawksearch.css');
with this one
$configViewModel->getHawkUrl('includes/hawksearch.min.css');
Unload hawksearch.css file
In case you want not to load hawksearch.css file from Hawksearch server please follow these steps:
- Place the custom default.xml layout file in the following location
<theme_dir>/HawkSearch_Proxy/layout - Put the following content in layout file:
<page xmlns:xsi="http://www.w3.org/2001/XMLSchema-instance"
      xsi:noNamespaceSchemaLocation="urn:magento:framework:View/Layout/etc/page_configuration.xsd">
    <body>
        <referenceBlock name="hawksearch.head" remove="true"/>
    </body>
</page>