

For Administrators
Multisource indexing: Setup
Goal
The goal of this article is to show you how to create additional data sources which are a part of the indexing process as well as how the system handles data source failures.
Prerequisites
- Configured Web Api Indexing - Kentico: Indexing API Overview
- Indexing type set to Indexing API in Settings/Integration/Hawksearch/Indexing settings.
Overview
You can add additional data sources for specific indexes which become a part of the indexing process. When the system begins a full indexing scheduled task, it sends a post request to each data source with a predefined API Key as well as the new Hawksearch index name so they can begin indexing as well. Those data sources are then responsible for sending status update requests back which determine if indexing fails or not based on settings. Explained in more detail below.
Adding additional data sources
- Open the side menu application selector (F2 or button top left) and go to Custom / Hawksearch.
- Go to Indexing Api / Data Sources.
- Click New data source.
- Name - choose a unique name for this data source.
- API Key - choose a unique random API Key which will be used for this data source. This will be sent to the data source to ensure the validity of the request so we recommend choosing a random GUID.
- Index name - choose the index for which you wish this data source to be. Predefined names coming from Kentico: Manage indexes .
- Url - the url to which the system will send a post request along with the API Key and the new Hawksearch index name.
- Severity - you can choose between Low & Critical. There are differences in the way the system handles failure based on this value. Explained further below.
- Timeout interval - choose a duration in minutes. This duration determines how long the system will wait after notifying the data source before it is marked at timed out.
Workflow
When a full indexing scheduled task runs, the system notifies external data sources by sending the API Key for that data source as well the new Hawksearch index name. Each data source is then responsible for sending status update requests back to the system. If a data source doesn’t respond for a period longer than Timeout interval (in minutes), it is marked as timed out. If a data source times out or has a failing status update, indexing can fail based on the severity of the data source.
There are different workflows based on the severity of the data source:
- Low Severity:
- Success - the indexing procedure will continue as usual and the indexing will not fail.
- Fail/Timeout - the indexing procedure will continue as usual and the indexing will not fail.
- Critical Severity:
- Success - the indexing procedure will continue as usual and the indexing will not fail.
- Fail/Timeout:
- Use deferred indexing is disabled - the indexing procedure will continue as usual and the indexing will not fail.
- Use deferred indexing is enabled - while deferred indexing is enabled, the connector will create the new index while keeping the old one so that there is no downtime while the indexes are swapped. If the Critical Severity data source fails to index or the Timeout interval is exceeded, the newly created index will be removed and the system will continue to use the old one.
Next Step
System Settings Setup
Goal
This article provides information on how to configure the connector for a Kentico project.
Prerequisite
Steps to configure Kentico connector
- From the application selector side menu (F2 or button top left) choose the Settings application.
- Go to Integration / Hawksearch where you’ll find the settings for the connector.
Search settings
- Client Guid / Tracking Key - The client guid / tracking key for your Hawksearch instance. You can find this in your Hawksearch user profile at e.g. https://dev.hawksearch.net/admin/contact.aspx in the Setup Info category.
- Base search API Url - This is the base Hawksearch search API Url, e.g. https://searchapi-dev.hawksearch.net
- Tracking Url - This is the Hawksearch tracking Url, e.g. https://tracking-dev.hawksearch.net/api/trackevent/
- Frontend framework - You can choose between Vue and React.
Indexing settings
- Indexing enabled - Is the indexing functionality enabled.
- Multilingual indexing enabled - Is multilingual indexing enabled. When enabled, culture suffixes will be appended to the end of Hawksearch field names and current culture information will be forwarded to Hawksearch with each search & autocomplete query.
- Delta indexing enabled - Is delta indexing enabled. Delta indexing means that whenever you insert / update / delete an object that has a corresponding Field Mapping defined, the connector automatically sends the updated information to Hawksearch.
- Indexing type - Here you can choose between the 2 indexing options - File Export and Indexing Api. The File Export option generates text files which need to be submitted to Hawksearch while the Indexing Api option sends API requests to Hawksearch with the necessary information.
- API Key - The API key for your Hawksearch instance. You can find this in your Hawksearch user profile at e.g. https://dev.hawksearch.net/admin/contact.aspx in the Setup Info category.
- Base dashboard API Url - This is the base Hawksearch dashboard API Url, e.g. https://dev.hawksearch.net/api/v9
Next steps
Multilingual: Setup
Goal
The purpose of this article is to provide an easy step-by-step guide to help you configure the multilingual functionality.
Prerequisite
- Configured connector - Kentico: System Settings Setup
- Indexing API Overview - Kentico: Indexing API Overview
- File Export Overview - Kentico: File Export overview
- Introduction to multilingual functionality - Kentico: Multilingual Overview
Steps to set up the multilingual functionality
- From the application selector side menu (F2 or button top left) choose the Settings application.
- Go to Integration / Hawksearch where you’ll find the settings for the connector.
- Go to the Indexing settings category and enable Multilingual indexing enabled.
- If using File Export indexing, create an attribute mapping with the Hawksearch field name “language” and Destination field name “DocumentCulture”. Do this for each page type you’d want to be indexed. The data is taken from the CMS_Document database table.
- Re-index your index - Kentico: Indexing API Overview .
Workbench changes
Visitor Targets
Something very important that needs to be done in order for the indexing functionality to work is to add Visitor Targets for each language you want to use.
Navigate to the Engine → Workbench → Merchandising → Visitor Targets
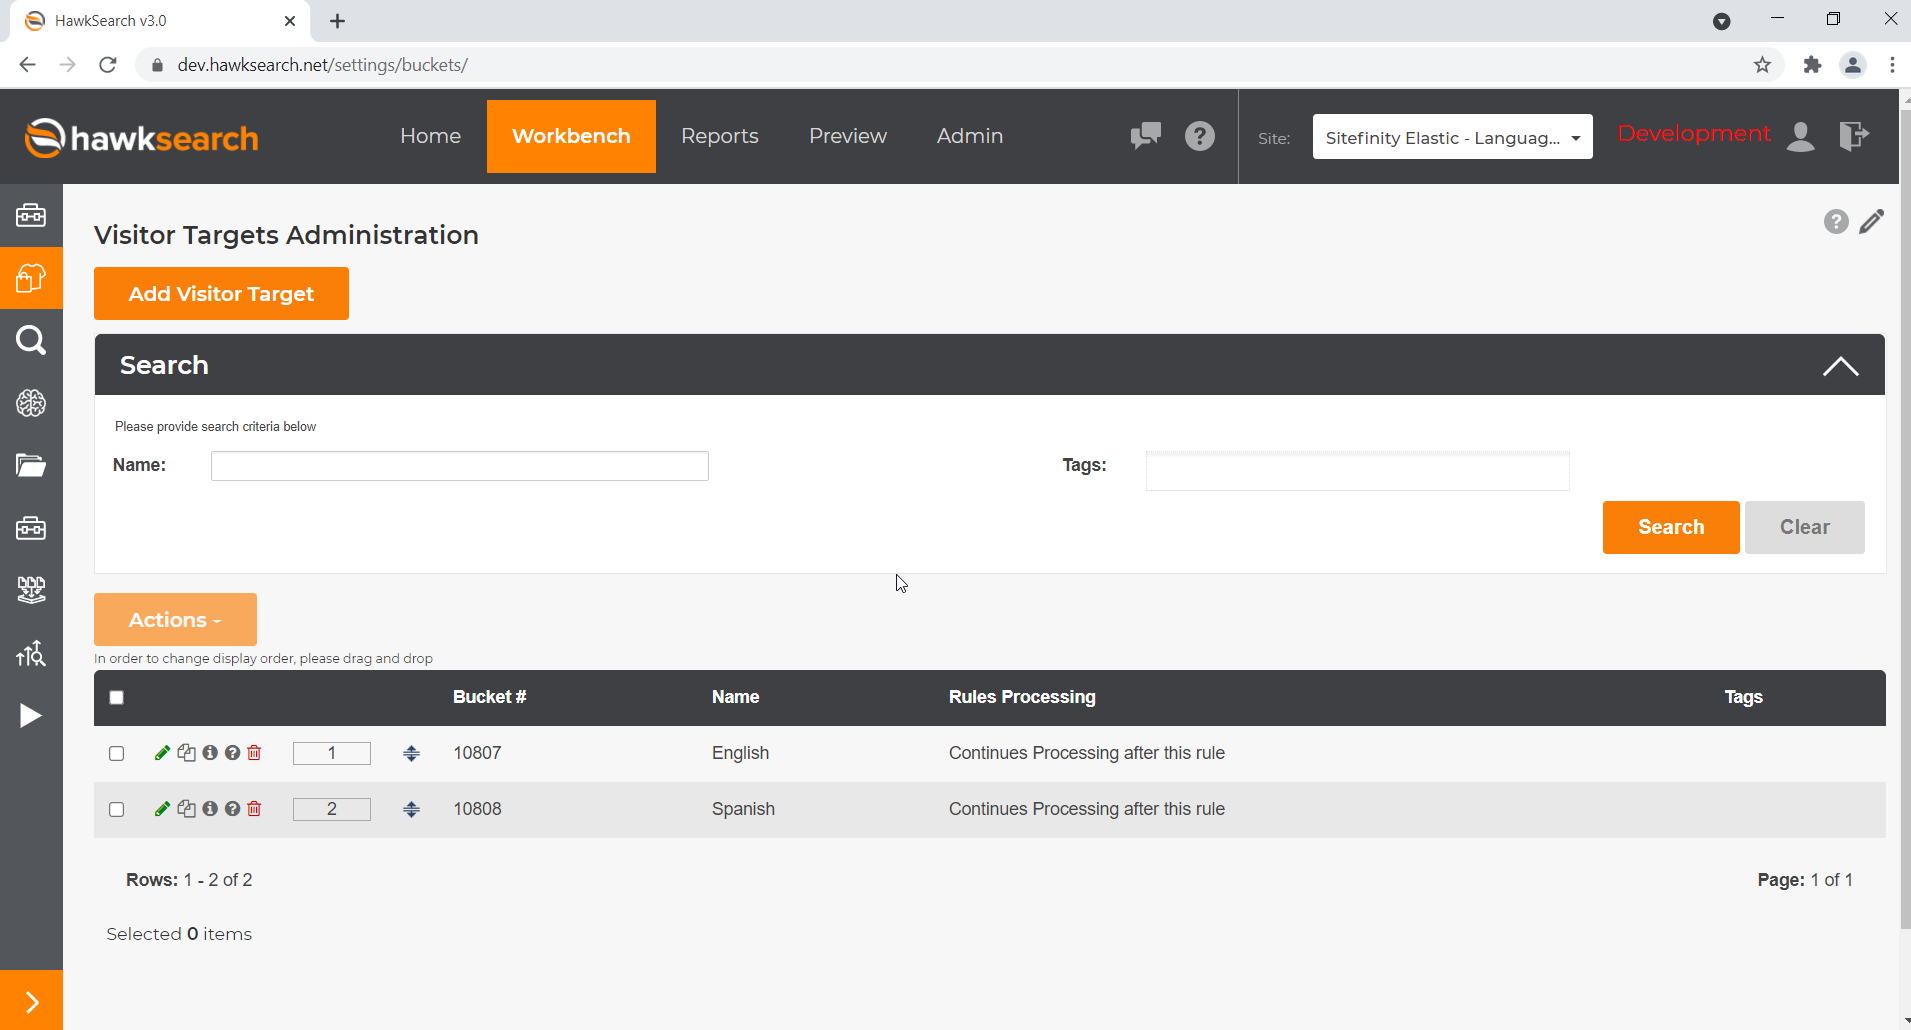
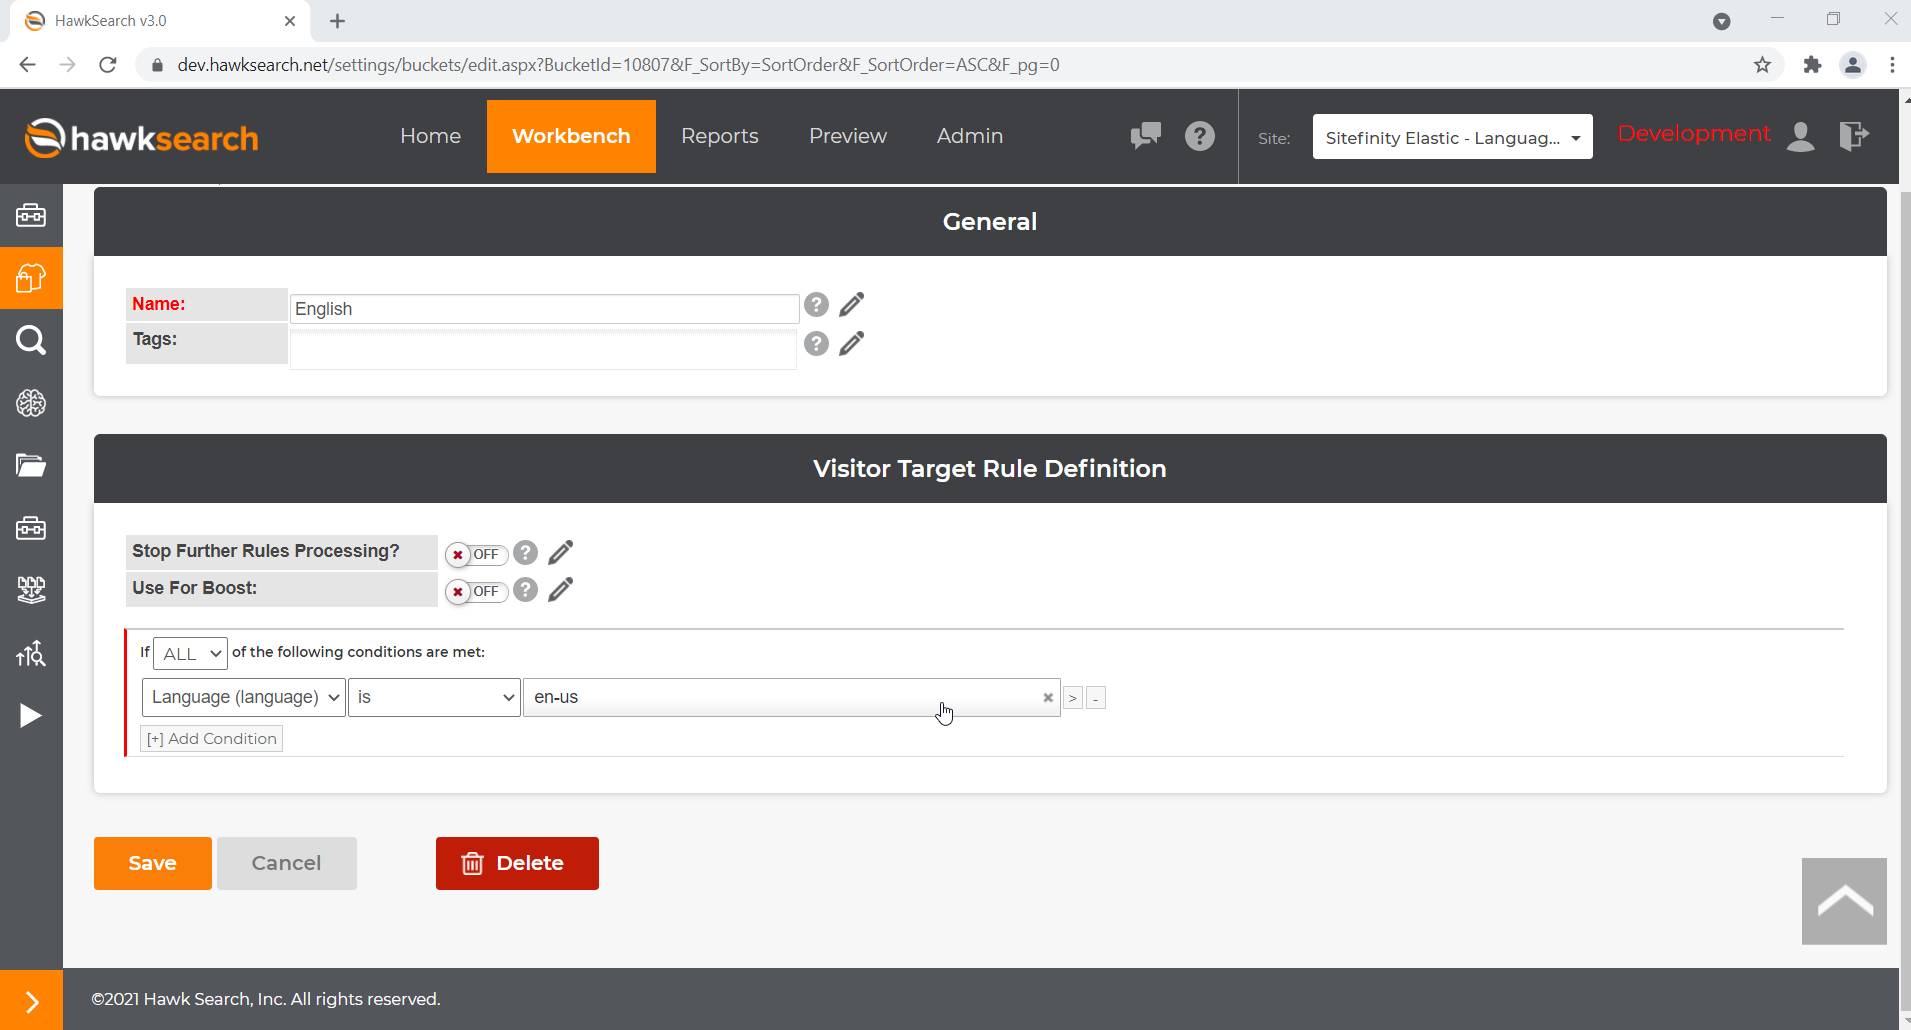
Add a corresponding visitor target for each language of your choice. Keep in mind that the language fields will be sent in the form of a culture code which can be found in the CMS_Culture table in the database. For example for English the language field will state “en-us” while for Spanish it will be “es-es”. If uncertain of the format, check the CMS_Culture table for exact codes.
Visibility Rules
Another thing that needs to be done is to add corresponding Visibility Rules for each language which filters out the documents of that language when the Visitor Target isn’t met.
- Navigate to the Engine → Workbench → Merchandising → Visibility Rules
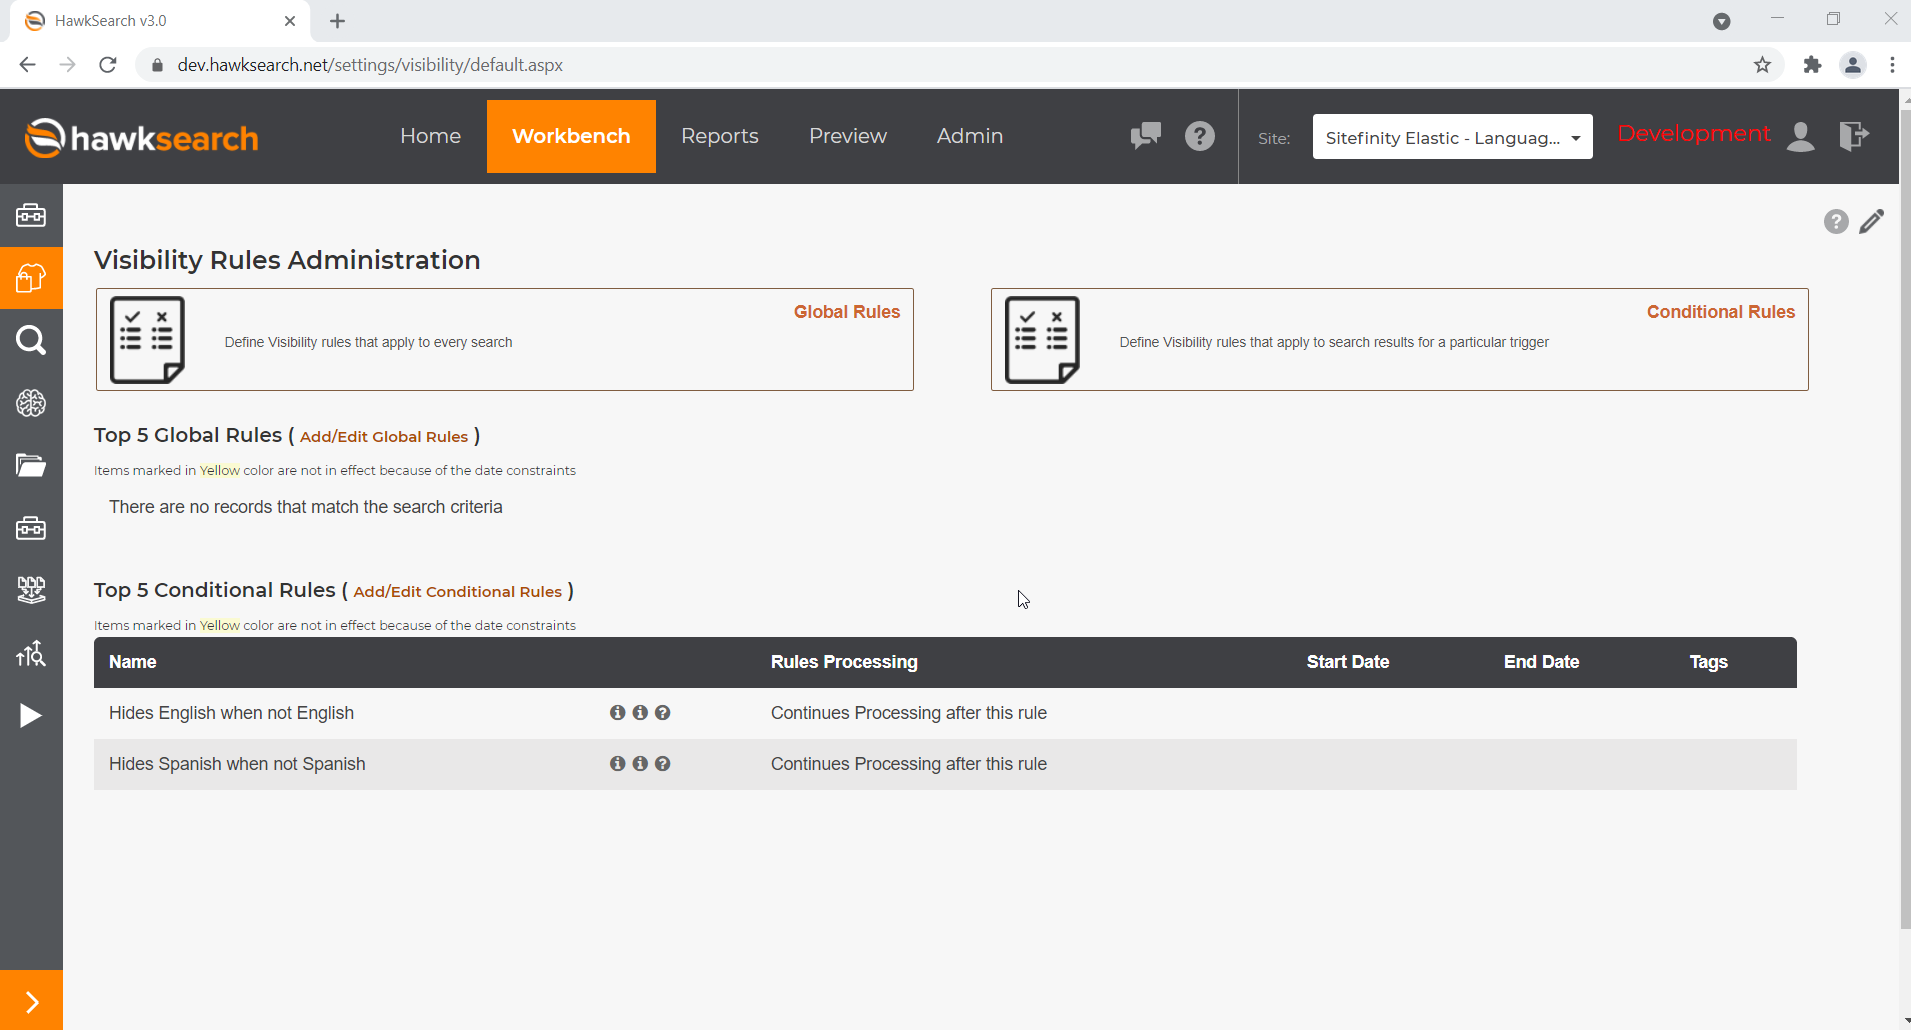
- Click on Conditional Rules
- Click Add Rule.
- Fill out the rule for each language like so.
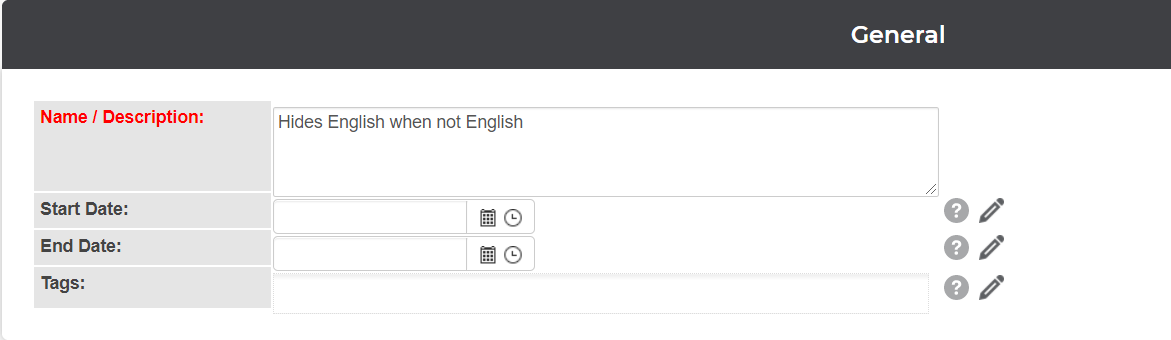
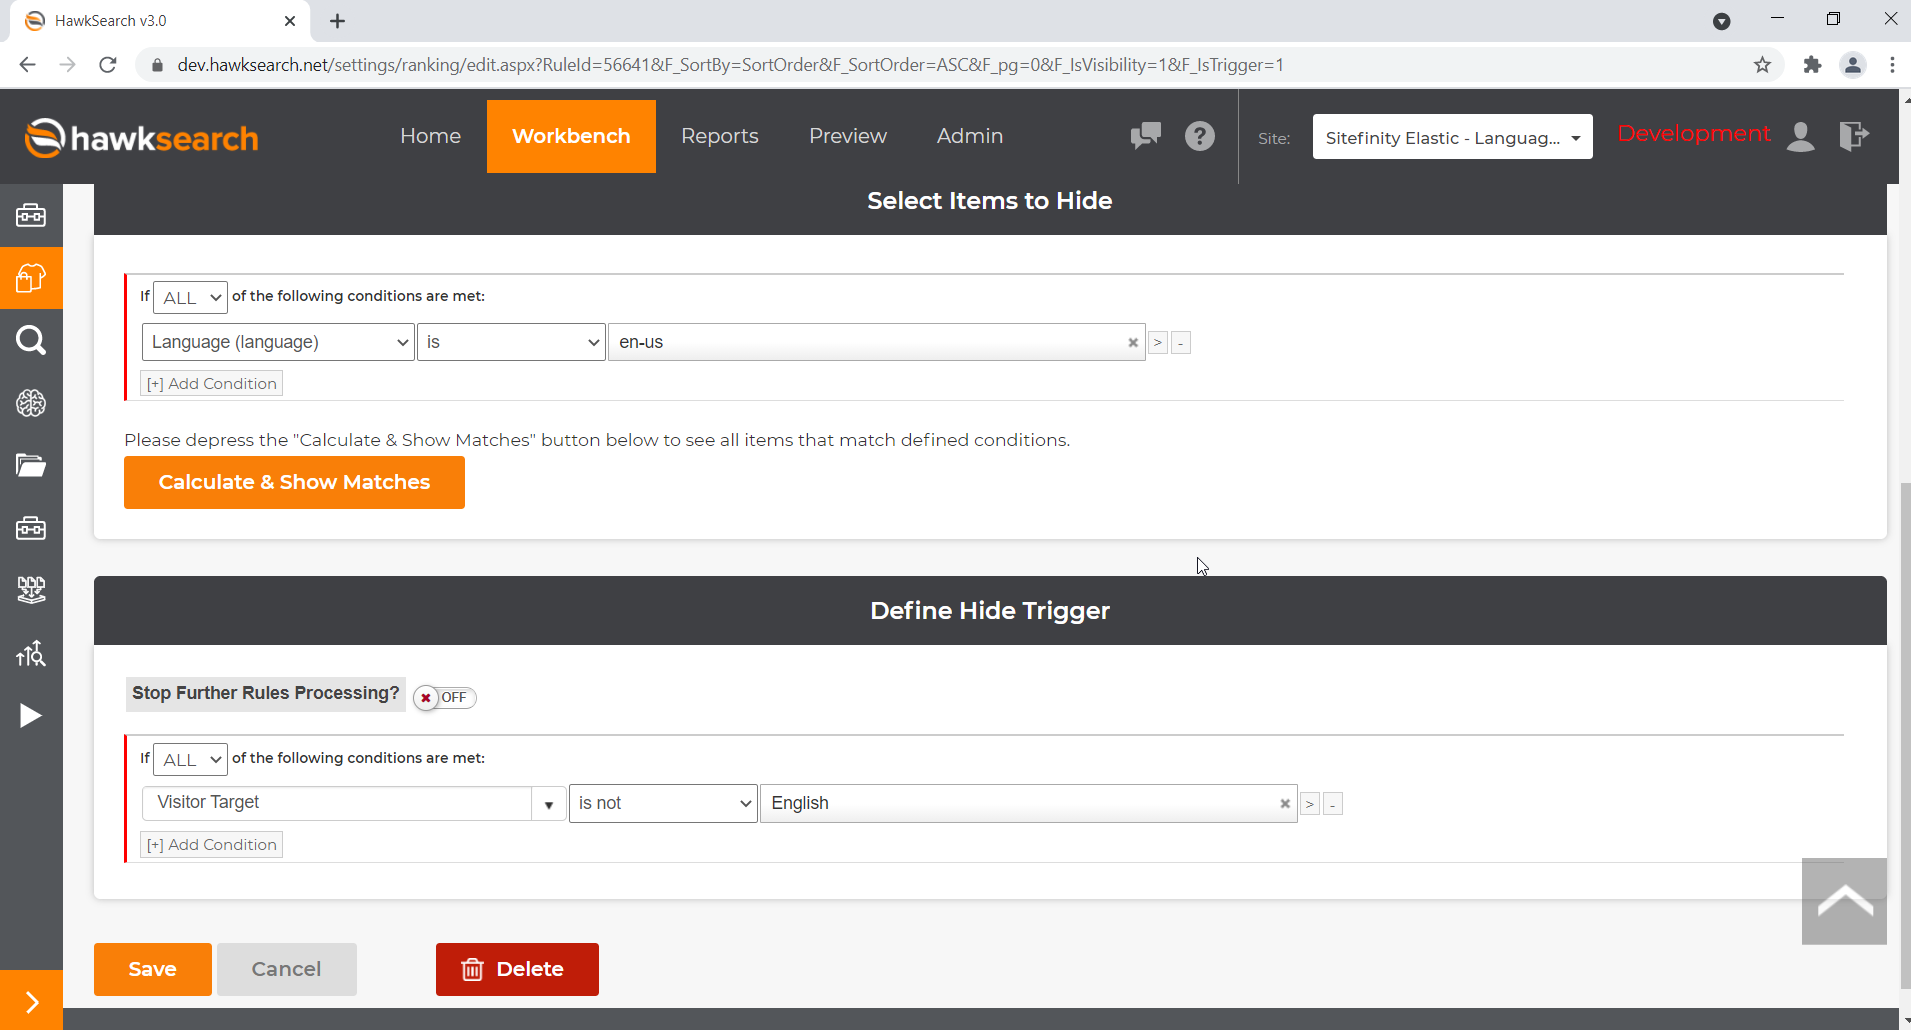
What this essentially does is hide all documents which have the language value en-us whenever the English Visitor Target we created earlier isn’t met. When you chain those rules for each language, at the end you are left only with the documents for the language that was sent to Hawksearch via the widgets.
Filter by permissions: Setup
Goal
The purpose of this article is to provide you with a step-by-step guide on how to configure the permission filtering functionality.
Prerequisite
- Configured connector - Kentico: System Settings Setup
- Indexing API overview - Kentico: Indexing API Overview
Steps to configure permission filtering
- From the application selector side menu (F2 or button top left) choose the Settings application.
- Go to Integration / Hawksearch where you’ll find the settings for the connector.
- Make sure Use permission filtering is enabled.
- From the application selector side menu (F2 or button top left) choose the Roles application.
- Create a role called Unauthenticated Users.
- From the application selector side menu (F2 or button top left) choose the Users application.
- Edit the public user.
- Go to their roles on the menu on the left and assign them the role you just created.
- Create or use an existing Page Type to create two separate pages in the Pages application for you to index.
- In the Pages application, click on one of the pages you just created then click on Properties / Security.
- Add the new role to the list and make sure you check the Allow Read on the access rights.
- Repeat the process, but for the second page and this time make sure you check the Deny Read on the access rights.
- Re-index the index - Kentico: Indexing API Overview
- Go to the live MVC application after setting up the widgets - Kentico: Working with widgets .
- Perform a search.
- If everything worked correctly, you should not see the page you denied permissions for.
How it works
Search Workflow
Note
When filtering is active the connector exposes endpoints for the search and autocomplete requests making it work as a proxy, so all of the search and autocomplete request are sent directly to Kentico.
- Typing in the search box sends a request to Kentico autocomplete endpoint, searching sends a request to Kentico search endpoint.
- On it’s end Kentico makes a server-side call to the Hawksearch API with the following parameters :
- Client ID, Index name, Keyword, Page number, Sort By, Boost and Bury etc.
- Query - contains information about the current user roles
- The Hawksearch API then responds with a set of results depending on the parameters sent:
- It uses the Query parameter to determine which results should be sent back - it compares the user roles to the permissions for each result. If the user is denied access to a specific result it is not sent back.
- Kentico then passes these results to the Hawksearch results widget to be displayed on the frontend
Indexing Workflow
There are many operations that need to be executed in order to provide the user with the proper results such as filtering by permissions, paging, boosting certain results.
- Indexing
When the index is created and Filter by Permissions is turned on in the Hawksearch configuration each document is sent with fields specifying which roles are permitted to view the document. As mentioned in the Search Workflow when a search request is made it contains the roles of the user making the request. Hawksearch then compares these roles with the permissions of each document and determines whether the user can view the document.
Indexing Child Page Type Text Components
Goal
The purpose of this article is to provide you with a step-by-step guide on how to Index child page type text components.
Prerequisite
- Configured connector - Kentico: System Settings Setup
- Indexing API overview - Kentico: Indexing API Overview
Steps to Configure Child Page Type Indexing
- Access the application selector side menu by pressing F2 or clicking on the button located at the top left. Select the Settings application.
- Navigate to Integration / Hawksearch. This is where you'll find the settings for the connector.
- Look for the Child Text Indexing section and specifically the Child Mapping setting.
- The values for this setting are separated by semicolons (;), and within each value, different components are separated by vertical bars (|).
- The format for inputting values should be as follows:
"/path_to_child_page|component_type|field_value;"
For example: "/components|component.text|RichText;/components|component.features|RichText;"
Here:- /path_to_child_page denotes the path to the child page.
- component_type indicates the type of component.
- field_value specifies the field's value, which in this context, is text.
- After configuration, run a new index to verify that child page types are indexed correctly.
Indexing Media Documents
Goal
The purpose of this article is to provide you with a step-by-step guide on how to Index documents.
Prerequisite
- Configured connector - Kentico: System Settings Setup
- Indexing API overview - Kentico: Indexing API Overview
Steps to configure document indexing
- From the application selector side menu (F2 or button top left) choose the Settings application.
- Go to Integration / Hawksearch where you’ll find the settings for the connector.
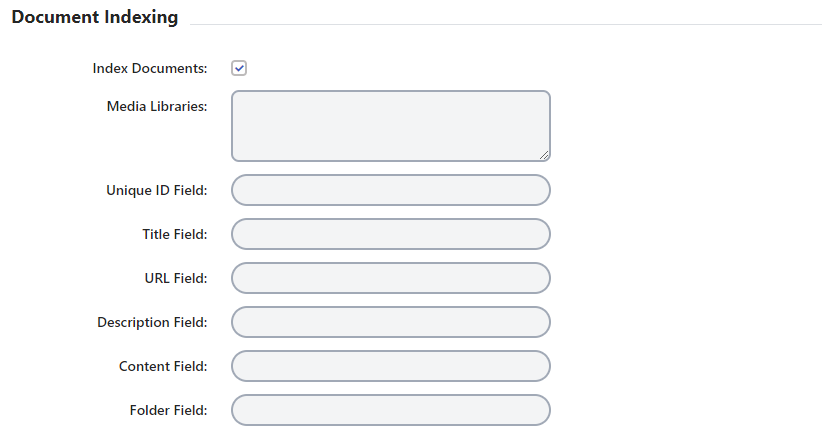
- Make sure Index Documents is enabled.
- In the Media Libraries section you will want to include the Media Libraries to index seperated by a “;”.
Ex: Documents;Icons;Images; - Set the approprate HawkSearch Field name for the following fields: UniqueId, Title, URL Field, Description, Content, and Folder.
- Run a new index and confirm your documents are indexed.
Notes
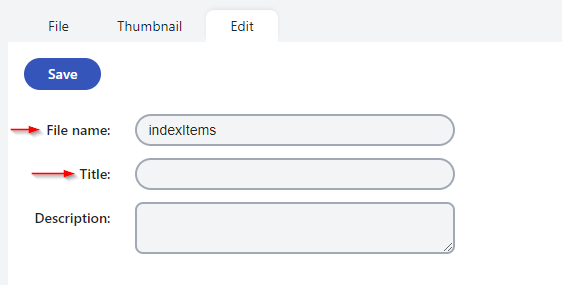
- Title: By default, the file name will populate the Title field. However, if a title is provided within the document itself, that title will take precedence and be used instead.
- Content: The Content field will contain the extracted information from indexed files, provided the files are in a format that can be parsed.
- Folder: The folder field represents the name of your media library. It's often utilized in scenarios like incorporating it into tab facets for better organization and navigation.