
Sitefinity Configuration
Multisource indexing: Setup
Goal
The Sitefinity connector provides a mechanism for notifying data sources for the start of the indexing procedure. This way, you can use multiple sources to add items to the Hawksearch index created by Sitefinity.
Add additional data sources
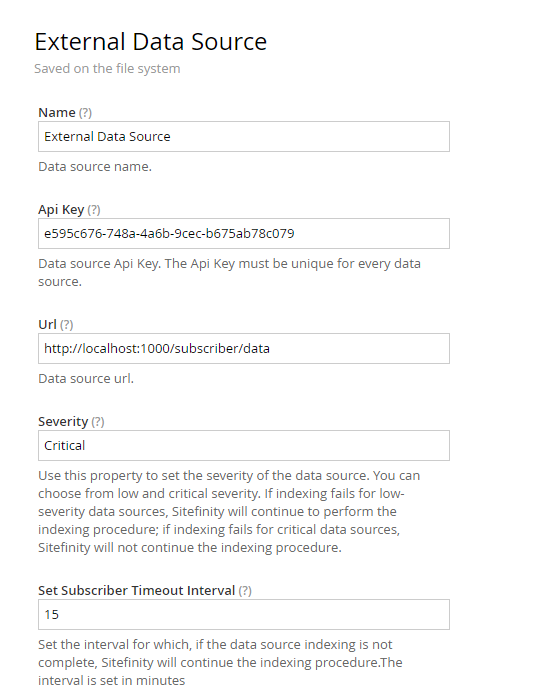
You can add additional data sources from Advanced Settings → Hawksearch → DataSources submenu (your-site-domain/Sitefinity/Administration/Settings/Advanced). You should provide the Data Source with Name, Api Key, Url, Severity and Timeout interval.
- Name - provide unique name for the data source.
- Api Key - provide a unique Api Key: the key has no restrictions. Can contain letters, characters and numbers.
- Url - the Hawksearch connector will use this Url to send a POST request to the data source
- Severity - the values for severity are “Low” and “Critical”. Based on this severity the indexing workflow will have different result.
- Timeout interval - you can set a timeout interval for each data source. If the timeout interval is exceed the workflow for failed data source will be executed.
Example:
Workflow
When reindexing is triggered by Sitefinity, the connector will notify an external indexing service by sending the Hawksearch index name and the Api key.
There are different workflows based on the severity of the data source:
- Low Severity:
- Success - the indexing procedure will continue as usual and the index data status will be updated.
- Fail - the indexing procedure will continue as usual and the index data status will be updated.
- Critical Severity
- Success - if Critical Severity data source finish indexing successfully, the indexing procedure will continue as usual.
- Fail:
- Deferred Index Activation is disabled - the indexing procedure will continue as usual and the index data status will be updated.
- Deferred Index Activation is enabled - while Deferred Index Activation is enabled, the connector will create the new index while keeping the old one so that there is no downtime while the indexes are swapped. If the Critical Severity data source fails to index or the Timeout interval is exceeded, the newly created index will be removed and the system will continue to use the old one.
Filter by Permissions: Setup
Goal
This article provides information about the functionality, configuration and workflow behind the filter by permissions feature of the Sitefinity connector.
Steps to configure filtering by Permissions
- Open the Hawksearch Settings: Administration → Settings → Hawksearch and select Filter By Permissions checkbox.
- Open the Sitefinity backend and create a role under (your-site-domain/Sitefinity/Administration/Roles)
- Open the Sitefinity backend, create a user under (your-site-domain/Sitefinity/Administration/Users)
- Assign the user the newly created role
- Go to Content and create one blog post and one news article
- Edit the permission for that role so that the user cannot view the News article you created
- In the right side menu on the News page open Set permissions
- Under who can view news press Change
- Check the advanced checkbox and add the role(s) you wish to deny
- Go to Administration → Search Indexes , create an index and reindex (your-site-domain/Sitefinity/Administration/Search)
- Create a Sitefinity page and open it for editing (your-site-domain/Sitefinity/adminapp/pages)
- Place the Hawksearch box and Hawksearch results widgets
- Open the widget designer of each widget and click the Filter by permissions checkbox
- Under Where to search? choose the newly created index and save the changes
- Login as the newly created user
- Open the page in the frontend and search for the content you created - it should not be visible
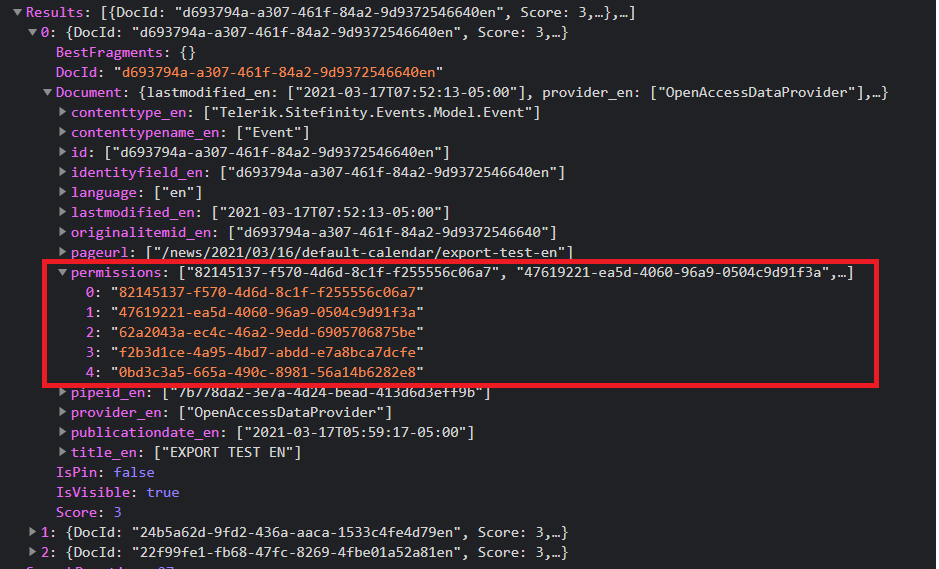
The Hawksearch config exposes a checkbox which specifies whether permissions and denials fields should be added to each document that is being indexed. These fields specify which user roles are permitted to view the document and which are denied. This checkbox is selected by default.
How it works
Search Workflow
When filtering is active the connector exposes endpoints for the search and autocomplete requests making it work as a proxy, so all of the search and autocomplete request are sent directly to Sitefinity.
- Typing in the search box sends a request to Sitefinity’s autocomplete endpoint, searching sends a request to Sitefinity’s search endpoint.
- On its end Sitefinity makes a server-side call to the Hawksearch API with the following parameters :
- Client ID, Index name, Keyword, Page number, Sort By, Boost and Bury etc.
- Query - contains information about the current user roles
- The Hawksearch API then responds with a set of results depending on the parameters sent:
- It uses the Query parameter to determine which results should be sent back - it compares the user roles to the permission and denials for each result. If the user is denied access to a specific result it is not sent back.
- Sitefinity then passes these results to the Hawksearch results widget to be displayed on the frontend
Indexing Workflow
There are many operations that need to be executed in order to provide the user with the proper results such as filtering by permissions, paging, boosting certain results.
Indexing
When the index is created and Filter by Permissions is turned on in the Hawksearch configuration each document is sent with fields specifying users in which roles are permitted to view the document and users in which roles and / or the user id are not allowed to view it. As mentioned in the Search Workflow when a search request is made it contains the roles of the user making the request. Hawksearch then compares these roles with the permissions of each document and determines whether the user can view the document.
Documents are having permissions field with the ids:
Paging
The paging is done on behalf of Hawksearch and depends on the following parameters that Sitefinity sends : page number, max results per page, sort by. Hawksearch then uses there parameters to return the correct set of results.
Boosting
If boosting is active Hawksearch introduces a functionality to Boost and Bury certain results depending on rules that can be created in the Hawksearch Dashboard.
Multilingual: Setup
Goal
The purpose of this article is to help you configure the multilingual functionality and to provide an easy step-by-step guide on how to configure the settings so that we can use this functionality.
Steps set up the multilingual
- Open the advanced settings: Administration → Settings → Advanced → Hawksearch
There you can find an option called “Enable Multilingual Support“ : check the box
- Re-index your index. Go to Administration → Search Indexes. Find the one you’ll use and re-index it. Or create a new one and re-index it.
- Create a page, where you place the HawksearchBox and HawksearchResults widgets.
- Open the widget designer of the widgets and select your index.
- Navigate to the front-end page with the widgets and there should be the option to select a language and when selecting a language the corresponding to this language results should be shown.
If we have only one language in the backend, then this menu is not displayed, even if it is an active multilingual, as there is no more than one selection option.
The page with the results should look like this:
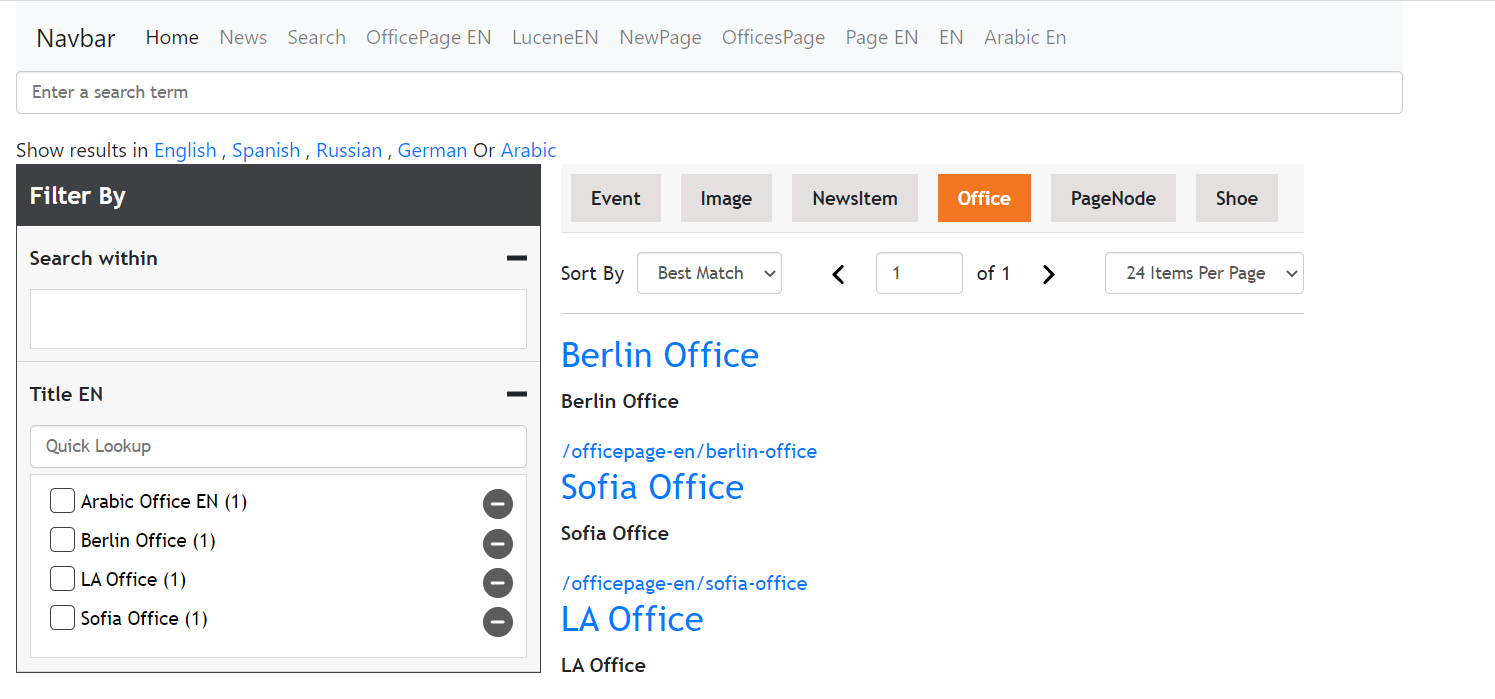
There should be a menu with the languages you’ve added and the initial results should correspond to the Default language. For changing the initial results language, the Default language in the backend should be changed.
Workbench changes
- Add Visitor Targets for each of the languages in the Workbench of the engine. Navigate to the Engine → Workbench → Merchandising → Visitor Targets
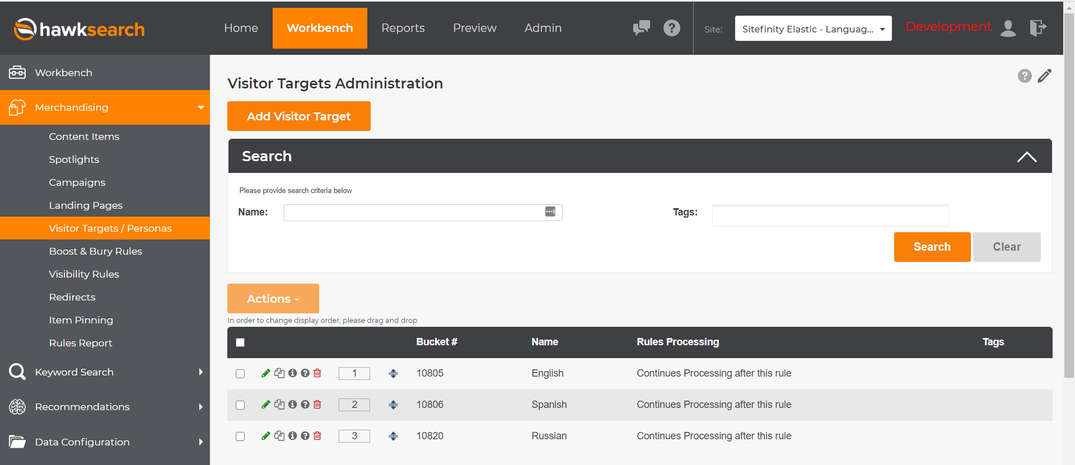
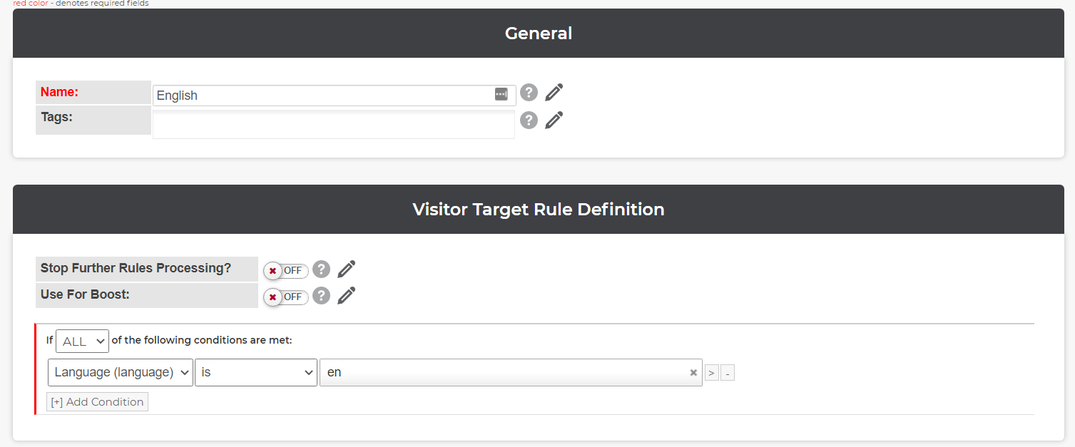
Select Add Visitor Target and fill up the fields. Example is shown below:
The condition option should be selected and as value on the left the “Language“ should be selected and as value on the right the language abbreviation.
A Visitor target should be added for each of the language that are selected in the backend.
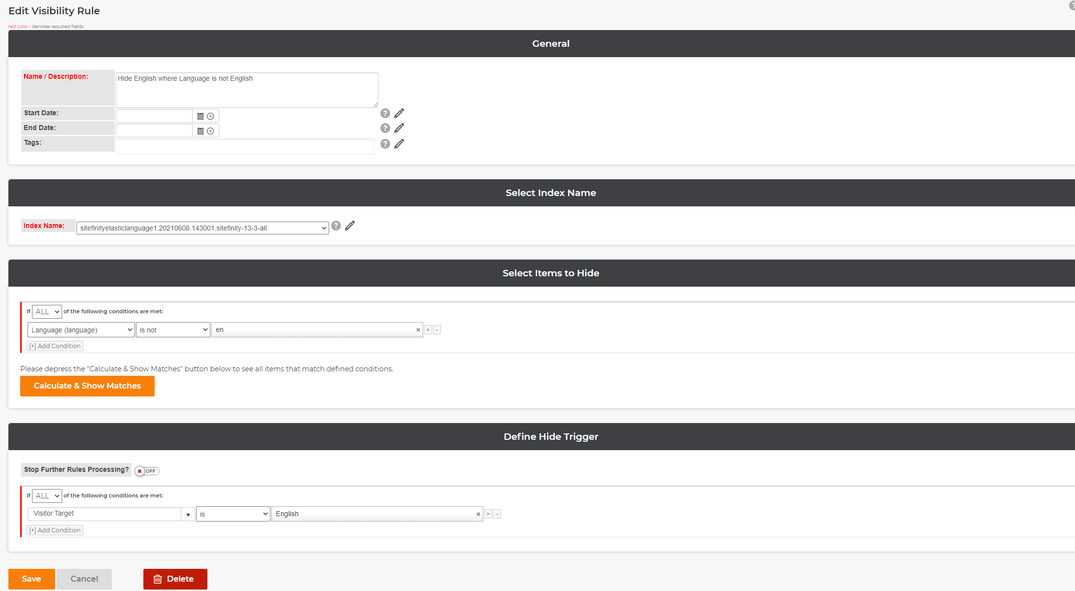
- Add Visibility Rules Navigate to the Engine → Workbench → Merchandising → Visibility Rules
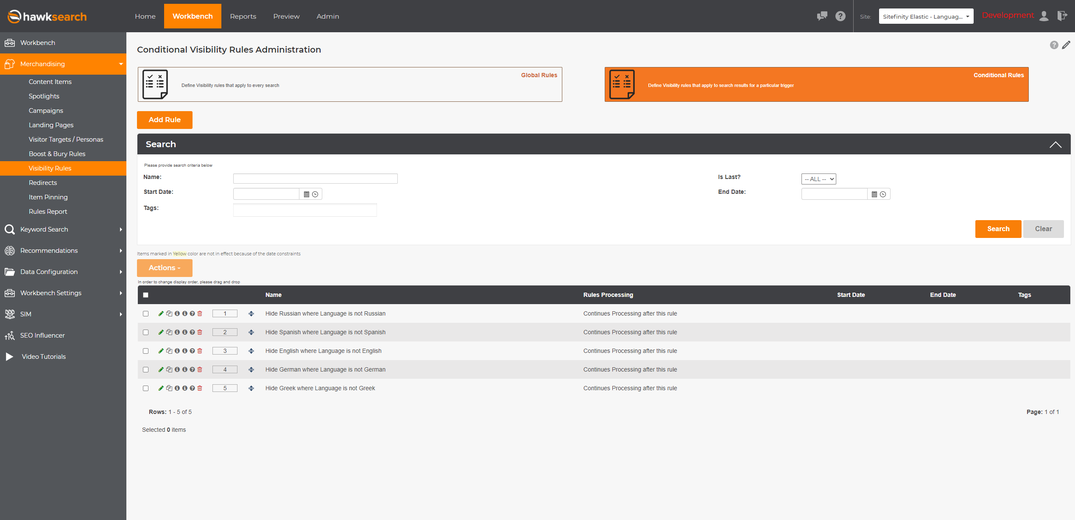
Add visibility rules for the every language that is added as Visitor Target. Hide the language when the Visitor Target is not from the selected the given language.
Autocomplete Configuration
- Navigate to the Engine → Workbench → Keyword Search→ Auto-complete
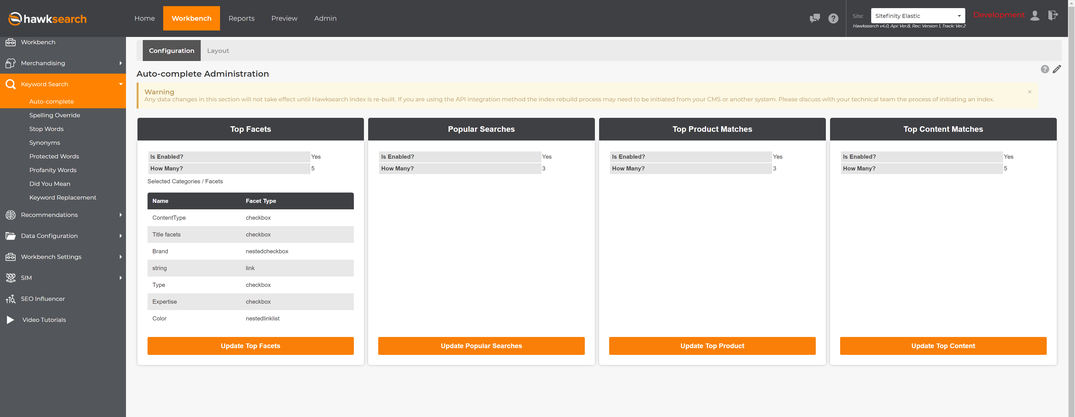
- Click the Update Top Product
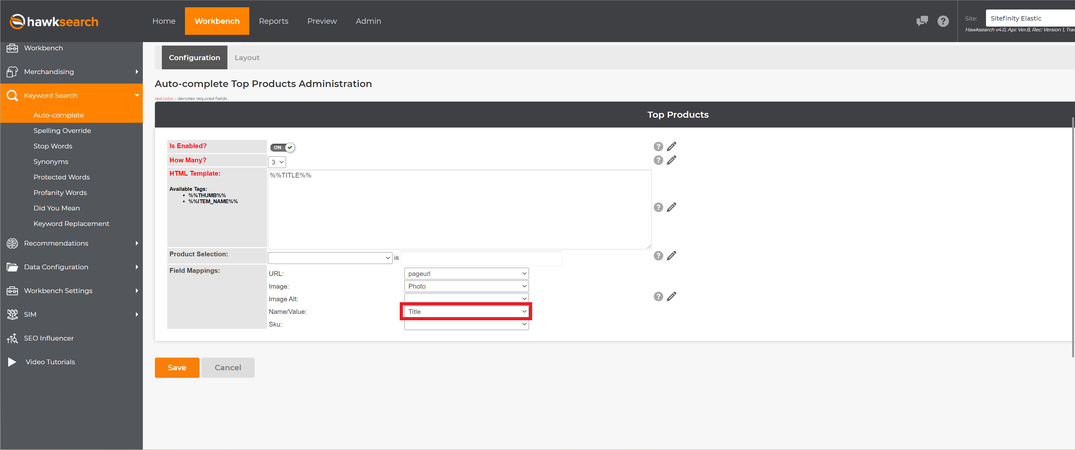
- If existing remove any value for the Name/Value field. In this case - Title
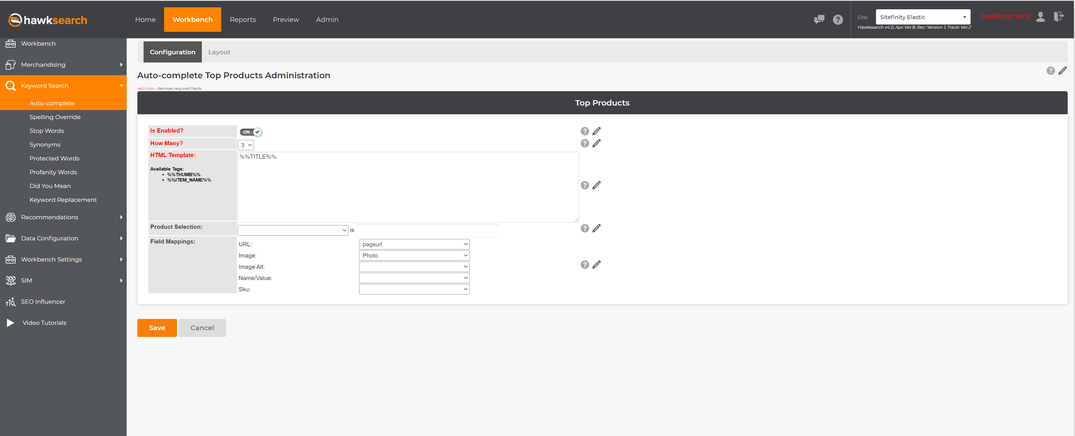
- Click the Save button
- Rebuild the index
- In the Hawksearch Box or Hawksearch results (SPA Mode) widget designer Data field, add the {"_suggestionItem":{"titleField":"field-name"}} to the Data object. For the value of the titleField, you must enter the field that you want to perform the autocomplete search without the language suffix, e.g. title
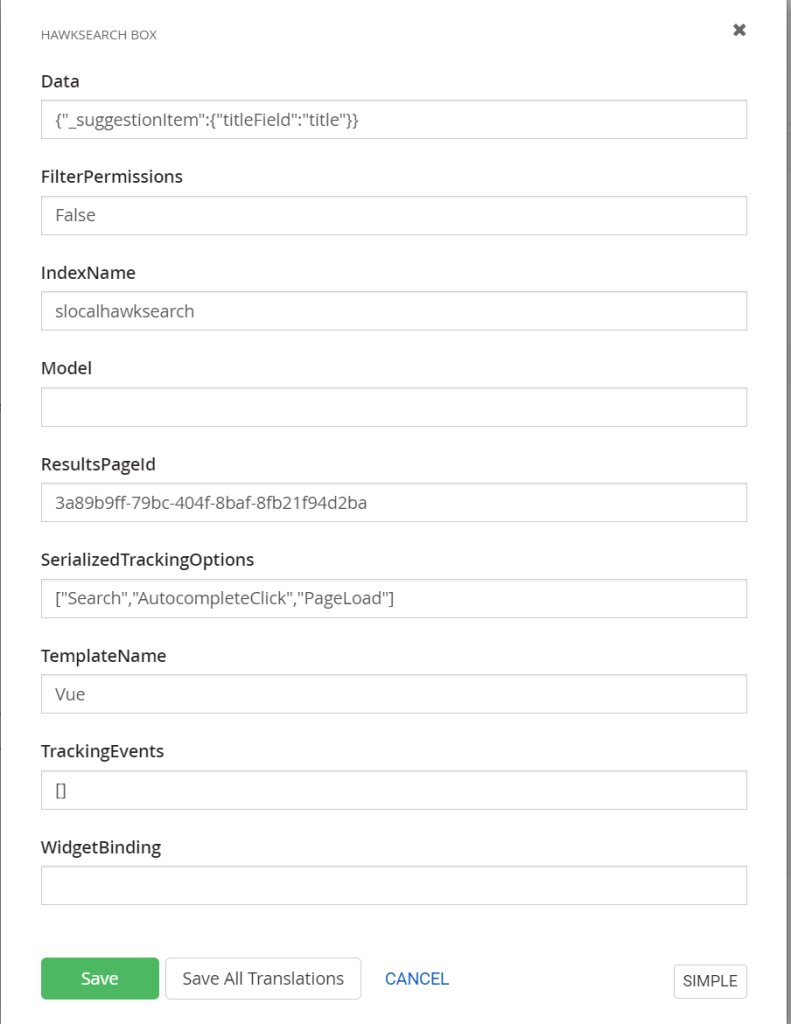
- Click Save
- Publish the page
Facet visualization when using the multilingual functionality
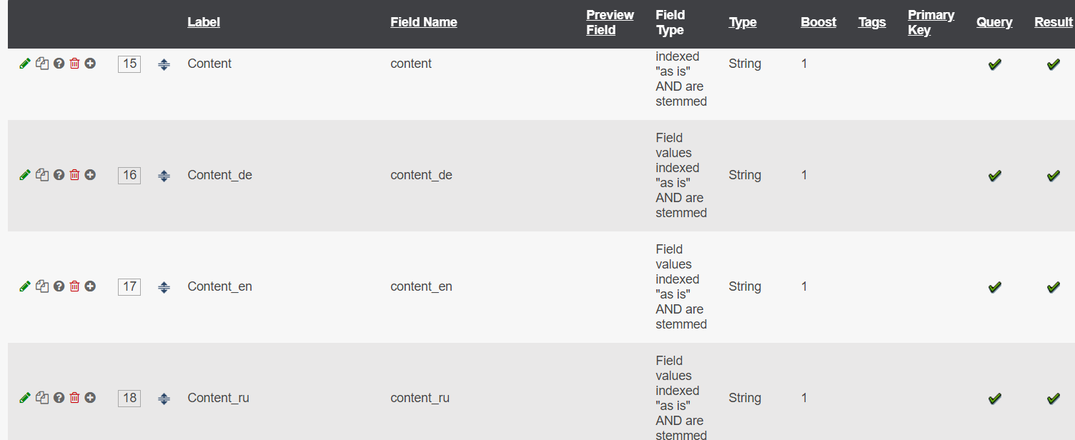
Enabling the multilingual and reindexing the items, changes also the way the fields are named. Most of the fields receive a language suffix. The suffix is concatenated underscore (“_“) and the 2 letter (“en“) language abbreviation.
Example:
contenttypename → contenttypename_en
title → title_ru
Therefore, the association of fields to facets may need to be changed. If you need to visualize a facet with the content type then you will have to make as many facets as there are languages selected (and for which there are items).
Example: if English, German and Russian are selected and there are items in these languages, when indexing these articles, the document fields will receive extensions in the respective language. Thus, the article in German will not have field contenttypename, but contenttypename_de, the article in English will have contenttypename_en, and so on.
Accordingly, there is no way to have one facet associated with the content field, because in this case we will not have such a field, and three other fields with suffixes (contenttypename_en, contenttypename_de, contenttypename_en).
Therefore, it is necessary to make 3 facets associated with the respective fields + language.
In this way we will not only see the facets correctly, but they will also be specific to the different languages. So if we don't have blogs in German, when selecting German Blogs won't appear as a facet, but if we do have in English, when selecting English they will be displayed as a selection option.
Be aware that when the multilingual option is enabled, the association of fields to facets may need to change.
One more time it is important to mention that the fields are changed when documents are indexed in the multilingual context. And if any of the fields, different from “content“ and “title“, are marked as queryable then after indexing, this fields are changed (suffix added). So these new fields (the one with suffixed) should also be marked in the Workbench as Queryable.
Map content field names from Hawksearch Admin page
Goal
Hawksearch connector provide the ability to map custom field names for Sitefinity content items. Following this article the Administrator can create a custom mappings for Sitefinity field names altering the search results. This article provides information on how this mapping is made from the Hawksearch Admin backend page.
Mapping default fields
The “default“ fields are all fields that are not custom and are being indexed by default from Hawksearch, e.g. title, content etc.
- Open Hawksearch Admin backend page - (your-site-domain/Sitefinity/Administration/hawksearchconfig)
- Select the content type.
- Select the field which name will be remap.
- Enter the new value for field name.
- Click the “Save Settings” button.
- Go to Sitefinity “Search indexes” backend page - (your-site-domain/Sitefinity/Administration/Search)
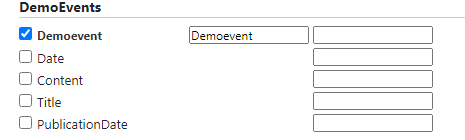
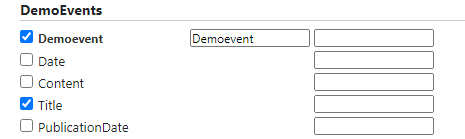
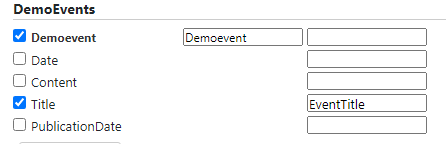
- Open the index that will be reindexed and in the “Advanced → Additional fields for indexing” section add the newly mapped field name. In our case “EventTitle”.

- Click the “Save changes” button.
- Click the action button of the index and reindex it.
Mapping custom fields
The “custom“ fields are all fields that additionaly created and are not part of the default fields.
- Open Hawksearch Admin backend page - (your-site-domain/Sitefinity/Administration/hawksearchconfig)
- Select the content type.
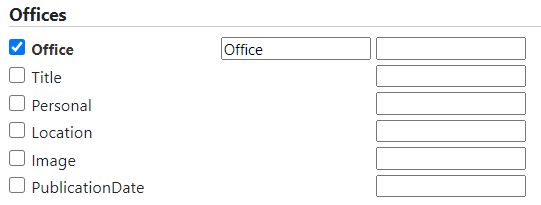
- Select the field which name will be remap.
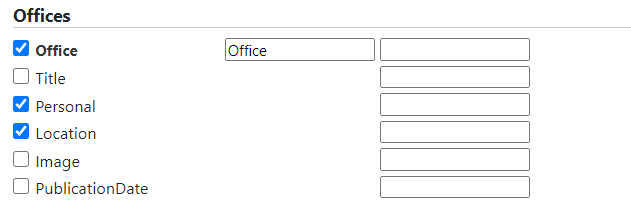
- Enter the new value for field name.
- Click the “Save Settings” button.
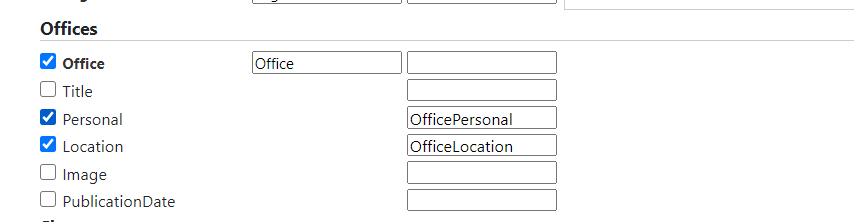
- Go to Sitefinity “Search indexes” backend page - (your-site-domain/Sitefinity/Administration/Search)
- Open the index that will be reindexed and in the “Advanced → Additional fields for indexing” section add field name. In our case “Personal” and “Location“.
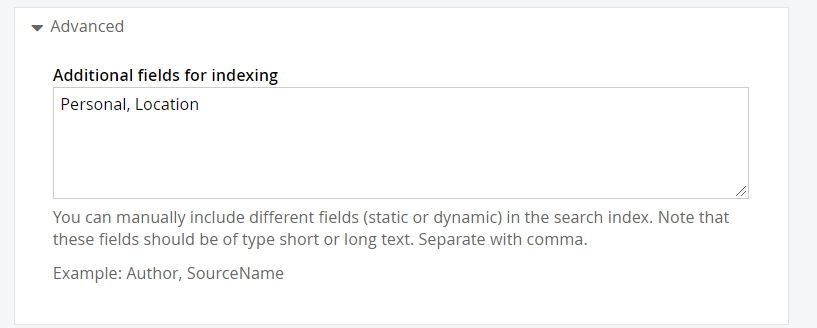
- Click the “Save changes” button.
- Click the action button of the index and reindex it.
- In the index you’ll see the fields with their newly mapped names.
Managing Indexes
Goal
This document provides information for Creating and Deleting V4 indexes through Sitefinity.
Steps to Create V4 Index
- Navigate to Sitefinity 'Search indexes' backend page (your-site-domain/Sitefinity/Administration/Settings/Basic/Search)
- Click ‘Create a search index’ button or click on an existing index
- From ‘Scope’ select content types that you want to index
- [Optional] Add additional fields to the index
- Expand the ‘Advanced’ section
- In the ‘Additional fields for indexing’ text box add your custom fields as a comma separated text
- Only fields of type - Short text, Long text, Classification and Related Media can be exported
- Click ‘Save changes’
- Go to ‘Actions’ of the corresponding index
- Press the ‘Reindex’ button
Steps to Delete V4 Index
- Navigate to Sitefinity 'Search indexes' backend page (your-site-domain/Sitefinity/Administration/Settings/Basic/Search)
- Click on the ‘Action’ button for the corresponding index
- Click on ‘Delete’
Modes for Generating Indexes
Goal
This article provides information about the generation of indexes, using Sitefinity and Hawksearch.
Overview
There are two ways to populate the index in Hawksearch:
- An automatic mode that works based on the index settings in Sitefinity and is supported by the latest version of Hawksearch that is based on Elastic.
- A manual mode that is managed by the Hawksearch Admin panel which is supported by all versions of Hawksearch.
Automatic mode
The automatic mode uses the Sitefinity Search service for creating an index. When Hawksearch is chosen as a search engine in the Sitefinity backend, an index is created from the backend page Administration → Search Indexes (your-website-url/Sitefinity/Administration/search).
From the Search Index page in the backend UI, there is an option to create a new index. By clicking the “Create index“ button a new page is being opened where a list with all content types is visualized. The chosen content types are those that are going to be indexed. Pressing the “Create“ button saves these specifications and creates a blank index without documents.
In order for the created blank index to be filled with documents, it should be reindexed. (From the Action drop-down → Reindex). This action will add documents to the index with information about the items. For each item from the chosen content types, a document is created. This document contains IdentityField with the Id of the item and a list of the fields, containing specific information about the record.
All these processes are happening through the Hawksearch API. For creating, deleting, updating etc. a call to the HawksearchClient is made and the corresponding action is processed.
When a record that has content type from these chosen for indexing, is being changed, the index is being updated. This way the search results are always up to date, with the latest changes.
Manual mode
The manual mode uses the Export Functionality for generating an index. The content types that a user wants to be indexed should be first exported, then uploaded and at the end indexed.
The content types can be selected from the Hawksearch Admin page (your-website-url/Sitefinity/Administration/hawksearchconfig). There can be selected the basic content types and the dynamic types(if such have been created from the Module Builder) and also the sites from which the information to be taken.
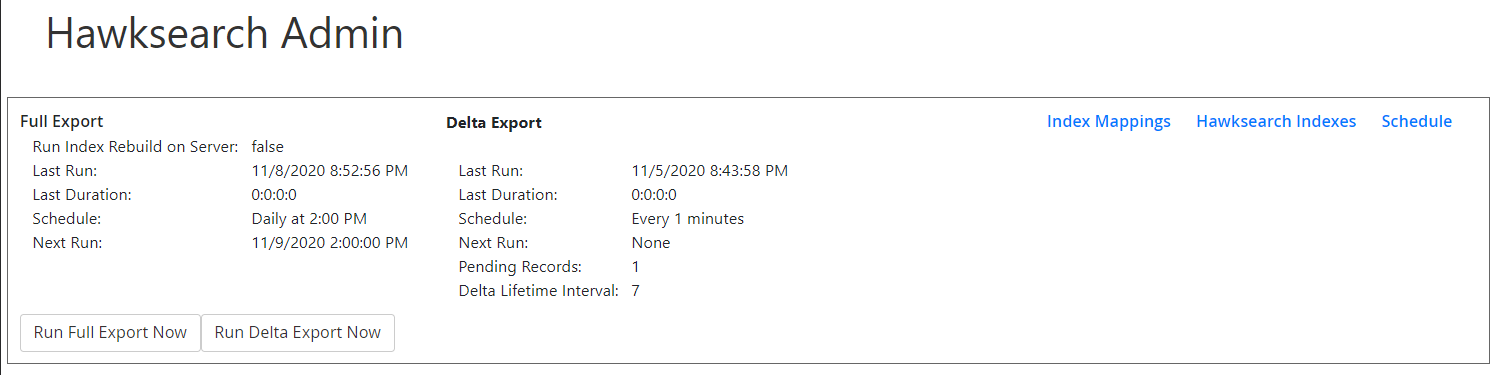
There are 2 types of export: Full and Delta export.
- The Full export takes all records of the selected content types in the Hawksearch Administration.
- The Delta export takes only the records that have been modified since the last export.
There are also 2 options for executing the export process:
- by clicking the buttons “Run Full Export Now“ or “Run Delta Export Now“
- by scheduling a Full or Delta export for a particular time or after some minutes.
When clicking one of the “Now“ buttons the corresponding type of export is executed immediately.
The scheduling provides the option to set a time for exporting the records. A Delta Export can be set to be run at an interval of minutes and a Full Export can be set for Daily or Weekly run at a particular time.
After clicking one of the export buttons or a schedule is being set a group of 4 files will be generated.
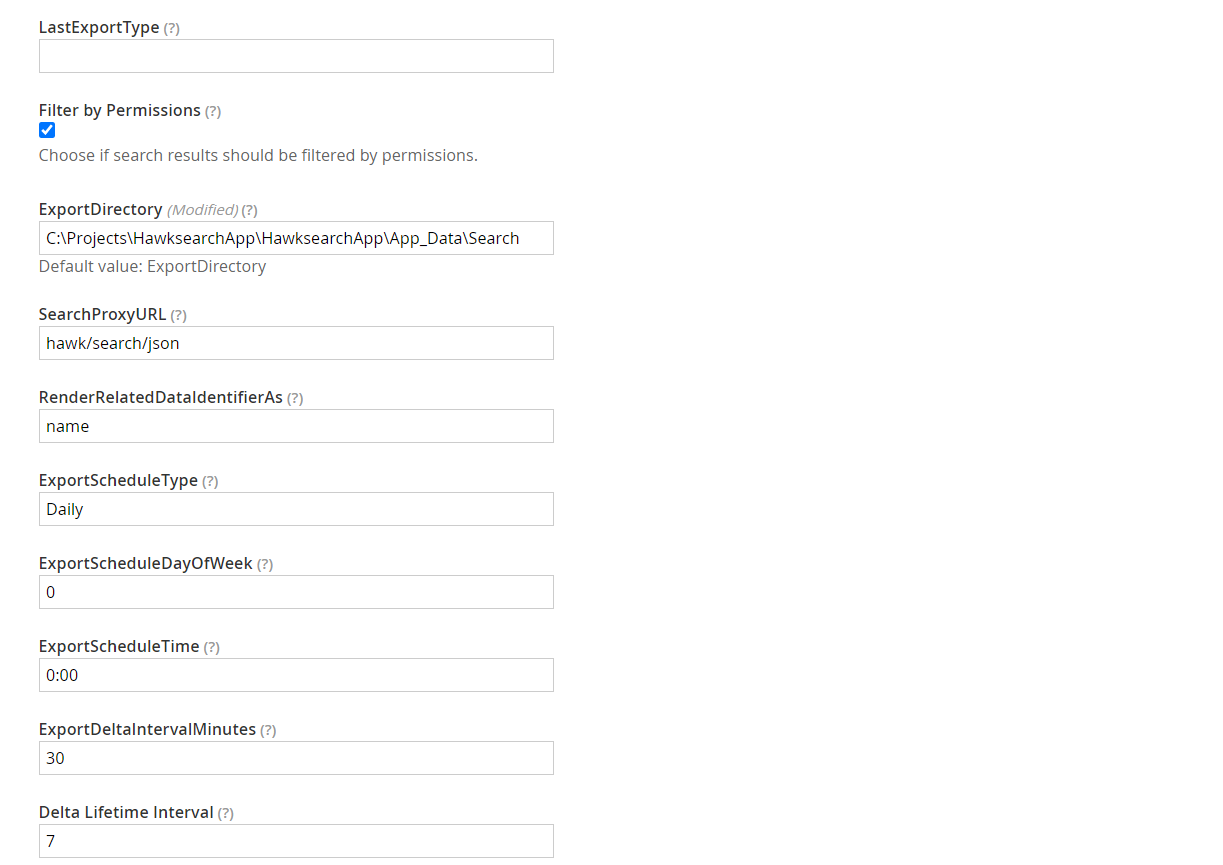
You can add the path to your local folder where those files to be exported from Administration → Settings → Advanced Settings → Hawksearch → ExportDirectory
These files should then be uploaded to the Hawksearch backend and based on the information they have a reindex will be triggered.
As a result the content types described in the exported files, are being indexed. These records can be seen in the Hawksearch Result Widget.
Export Overview
Goal
In this article, you will find information about running and executing the export. When and why should the export functionality be used.
The main purpose of the export:
Hawksearch can work on the following two environments: V4 and V4L. The exporter takes a major role in the second one. Тo index the items that we want the customer to search through, we need first to export in separate files the whole information about these content types and records. This information is then being uploaded and indexed so it can be visible on the page where the Hawksearch result widget is placed.
Main specifications of the export:
Since the Exporter is now CMS independent and can be used with any .NET system, it plays a significant role in the Hawksearch.SDK project. This way it gives the freedom to the customer to use the V4L version with different systems.
What settings do we need?
For using the manual mode (required for the V4L environment) the following settings need to be configured. First, the V4L needs to be selected from the dropdown menu.
- Go to Administration
- Choose Settings
- Go to Advanced
- Select Hawksearch
- Select V4L from the dropdown menu
You have to specify a path to a folder on your machine, on which the exported files to be stored. This is a simple configuration setting:

- Go to Administration
- Choose Settings
- Go to Advanced
- Select Hawksearch
- Write your desired destination in the ExportDirectory tab
How to run an Export?
There are 2 types of export available: Full and Delta.
- The Full export takes all records of the selected content types in the Hawksearch Administration. (Administration -> Hawksearch Administration)
- The Delta export takes only the records that have been modified since the last export.
The export will be started only for the content types and the sites selected in the Hawksearch Administration.
The second step is to choose what kind of export you would like to run. There are 2 buttons the backend user can click: “Run Full Export Now” or “Run Delta Export Now”.
Hawksearch provides also the option to schedule an export. This is possible by pressing the “Schedule“ button in the upper right corner in the Hawksearch Settings window. A delta export can be set for a particular interval of minutes and a full export can be set for a Daily or Weekly export at a particular time.
Differences between Delta and Full Export
The Full Export is taking all records of chosen content types. It’s recommended to use this kind of export when creating an index for the first time or if new content types or sites are being added.
The Delta Export is taking only the records that have been modified since the last export. It’s the better option when only some items are being modified and there is no need to export all records. But if there is a new item created from a content type that is not being indexed then prefer the Full Export.
The Hawksearch Administration provides a very convenient way to select items from the list of content types and export only those that are being modified: Pending Records.
This is a field that shows a number of changed items, that will be exported when running a Delta Export.
For a User, this can be used as an orienteer, if there is a need to add new content types and do a full export or not.
Event Tracking
Goal
This article describes how to configure Event Tracking in the Sitefinity connector and how it functions.
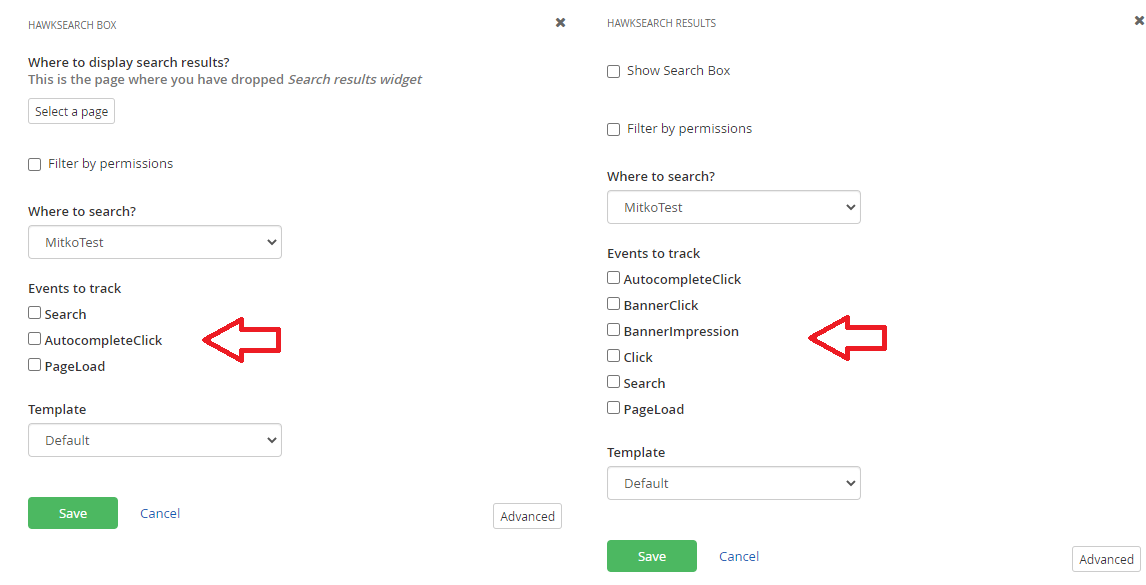
Steps to configure Event Tracking
- Open the backend of your Sitefinity instance and navigate to Administration → Settings → Advanced settings → Hawksearch (your-site-domain/Sitefinity/Administration/Settings/Advanced)
- Find and select the Enable Hawksearch Event Tracking checkbox
- Find the TrackingURL and update it
- Save the changes
- Navigate to Pages and open the one with the Hawksearch widgets (your-site-domain/Sitefinity/adminapp/pages)
- Open the widget designer of each widget
- Inside each widget designer, you should be able to see a list of Events to track
- Choose the Events you would like to track
- Save the changes
The TrackingURL could be different depending on the environment you are in.
How it works
Each time one of the Events that you have selected in widgets designer occurs, a request is sent to the Hawksearch Tracking API. The request contains information about the event and the visitor that performed the action. This information is then used to populate data in the Hawksearch reports in order to leverage the Personalized Search.
Furthermore, the Hawksearch Recommendation service also makes use of Event Tracking as it can display personalized content depending on the information gathered from the tracking.
Multilingual Overview
Goal
This article aims to give an overview of multilingual functionality, to explain the main specifics and what are the benefits of using it. It will explain when it is appropriate to use this functionality and what is the expected behavior from using it.
Overview
Multilingual is a new feature that Hawksearch provides to make searching and finding information in multilingual environments more convenient and systematic. Most platforms have the option to change the language and translate the articles to reach a larger audience. This is something that also happens with the help of Sitefinity, where we can translate and develop content in different languages. This has led to the need for the connector to allow its users to filter and group their content according to the languages in which it is created.
Specifics of multilingual functionality
By selecting the "Enable Multilingual" option, users see a page that allows them to select the language in which they would like to view the content. Above the results box, a menu appears with all the languages we have added to the backend. Each of these languages can be selected and the results of the respective language are visualized according to the selection. The menu remains visible even after selection, so the language selection can be changed constantly.
If we have only one language in the backend, then this menu is not displayed, even if we have an active multilingual, as there is no more than one selection option.
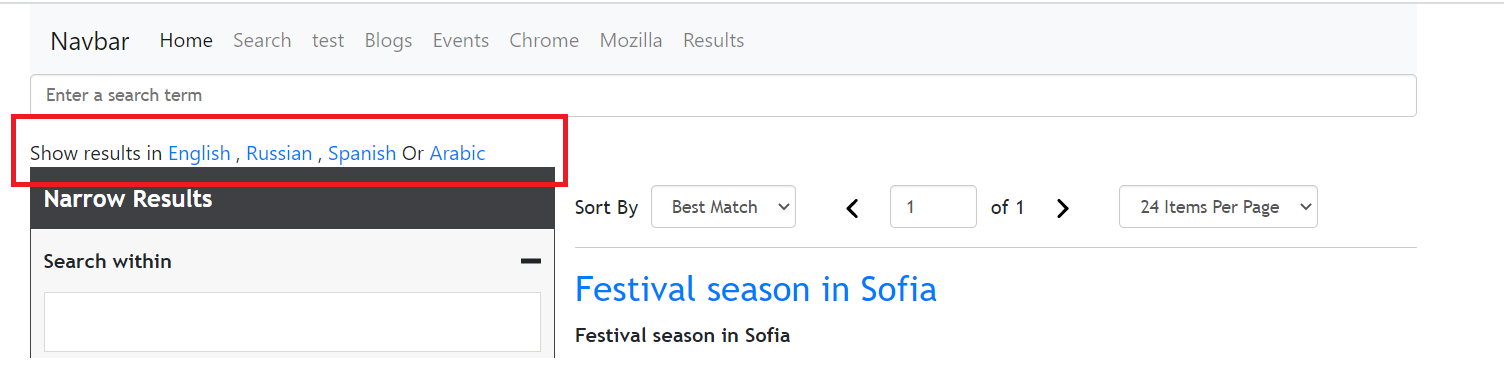
Which language is selected can be easily distinguished from the page URL. It changes according to the selected language, adding query ?language=en The query value changes, when another language is selected.


The results the user sees when the page is loaded are the ones from the Default language. If English is the default one then loading the page will show results in English until another language is selected. Changing the default language will also change the results that appear when the results page loads.
We can see which is the default language for our site by selecting in the top left corner “Your site“ → Manage Sites → Action → Properties → Languages for public content
The advantages of multilingual functionality
- Makes the searching easier
- Gives another option to filter the results
- Allows for more accurate targeting. For example, if the results are in German, one type of product should be published as a priority, and those in English as a secondary
External non-Sitefinity indexes
Goal
This article provides information and samples on the ability to select external indexes in Hawksearch widgets.
Select external index in Hawksearch box widget
You can extend the default ‘Hawksearch box’ widget designer functionality to show External Indexes. This way, you can search against Hawksearch indexes which are not created from Sitefinity.
- Override the default ‘Hawksearch box’ widget designer:
- Create ‘HawksearchBox’ folder in your Sitefinity Web App -> MVC → Views folder.
- Create a new DesignerView.Simple.cshtml in your ‘HawksearchBox’ folder.
- Create a helper class in which you will compare the indexes created in the API and the indexes created in Sitefinity. This will provide the list of indexes which are external to Sitefinity.
using System.Collections.Generic;
using System.IO;
using System.Linq;
using System.Net;
using System.Web.Mvc;
using Hawksearch.Configuration;
using Newtonsoft.Json;

namespace SitefinityWebApp.Search
{
    public static class DesignerHelper
    {
        public static List<string> GetExternalIndexes(this HtmlHelper htmlString, Dictionary<string, string> indexes)
        {
            var indexNames = indexes.Keys.ToList();
            var hawksearchIndexes = GetHawksearchIndexes().FirstOrDefault().Value.ToList();
            var externalIndexes = hawksearchIndexes.Where(hi => !indexNames.Any(hi.EndsWith)).ToList();

            return externalIndexes;
        }

        private static Dictionary<string, List<string>> GetHawksearchIndexes()
        {
            var index = new Dictionary<string, List<string>>();
            var request = InitializeIndexingApi();
            var response = request.GetResponse();

            using (var dataStream = response.GetResponseStream())
            {
                if (dataStream != null)
                {
                    var reader = new StreamReader(dataStream);
                    var responseFromServer = reader.ReadToEnd();
                    index = JsonConvert.DeserializeObject<Dictionary<string, List<string>>>(responseFromServer);
                }
            }

            return index;
        }

        private static HttpWebRequest InitializeIndexingApi()
        {
            var hawksearchHeader = "X-HawkSearch-ApiKey";
            var config = Telerik.Sitefinity.Configuration.Config.Get<HawkSearchConfig>();
            var indexingUrl = config.HawkSearchIndex;
            var apiKey = config.HawkSearchApiKey;
            var request = (HttpWebRequest)WebRequest.Create(indexingUrl);

            request.Headers.Add(hawksearchHeader, apiKey);

            return request;
        }
    }
}
- Create a Custom Model class which inherits from the base SearchBoxModel class.
- Override the GetIndex method of the SearchBoxModel.
using System.Web;
using HawksearchWidgets.Mvc.Models.HawksearchBox;

namespace SitefinityWebApp.Search
{
    public class CustomSearchBoxModel : SearchBoxModel
    {
        public CustomSearchBoxModel(HttpContextBase context, string resultsPageId, string data, string indexName = "") : base(context, resultsPageId, data, indexName)
        {
        }

        protected override string GetIndex(string indexName)
        {
            var index = base.GetIndex(indexName);

            if (string.IsNullOrWhiteSpace(index))
            {
                index = indexName;
            }

            return index;
        }
    }
}
- Rebind the widget model in the Global.asax → Bootstrapper_Bootstrapped method adding the code below. Change the CustomSearchBoxModel with your model class name.
        protected void Application_Start(object sender, EventArgs e)
        {
            Bootstrapper.Bootstrapped += Bootstrapper_Bootstrapped;
        }

        private void Bootstrapper_Bootstrapped(object sender, EventArgs e)
        {
            FrontendModule.Current.DependencyResolver.Rebind<ISearchBoxModel>().To<CustomSearchBoxModel>();
        }
- Go to pages (your-website-url/Sitefinity/adminapp/pages) and open a page on which you have placed the Hawksearch box widget.
- Open the widget designer and you will see a list of indexes separated by : ‘- External Indexes -’ label. Every index under this label will be external for the current Sitefinity instance.
- Choose the desired index, click save and publish the page.
Select external index in Hawksearch results widget
You can extend the default ‘Hawksearch result’ widget designer functionality to show External Indexes. This way, you can show results from the external index for Landing pages or Search queries.
- Override the default ‘Hawksearch’ widget designer:
- Create ‘Hawksearch’ folder in your Sitefinity Web App -> MVC → Views folder.
- Create a new DesignerView.Simple.cshtml in your ‘Hawksearch’ folder.
@using Hawksearch.Configuration
@using HawksearchWidgets.Helpers
@using SitefinityWebApp.Search
@using Telerik.Sitefinity.Frontend.Mvc.Helpers
@using Telerik.Sitefinity.Localization
@using Telerik.Sitefinity.Mvc

@{
     var isV4 = Telerik.Sitefinity.Configuration.Config.Get<HawkSearchConfig>().HawksearchVersion == HawksearchVersion.V4;
    if (isV4)
    {
        <div class="form-group">
            <div class="row">
                <div class="col-xs-6">
                    <div class="checkbox">
                        <label>
                            <input type="checkbox" ng-model="properties.ShowSearchBox.PropertyValue" ng-true-value="'True'" ng-false-value="'False'"/>
                            @Html.Resource("ShowSearchBox", "HawkWidgetsResources")
                        </label>
                    </div>
                </div>
            </div>
        </div>
        <div class="form-group">
            <div class="row">
                <div class="col-xs-6">
                    <label for="index">@Html.Resource("WhereToSearch", "HawkWidgetsResources")</label>
                    <select id="index" ng-model="properties.IndexName.PropertyValue" class="form-control">
                        <option value="">@Html.Resource("SelectSearchIndex", "HawkWidgetsResources")</option>
                        @{

                            var indexes = Html.GetIndexes();
                            var externalIndexes = Html.GetExternalIndexes(indexes);

                            foreach (var index in indexes)
                            {
                                <option value="@index.Key">@index.Value</option>
                            }
                            //Render the external indexes
                            <option value="" disabled>- External Indexes -</option>
                            foreach (var externalIndex in externalIndexes)
                            {
                                <option value="@externalIndex">@externalIndex</option>
                            }
                        }
                    </select>
                </div>
            </div>
        </div>
    }
}

<div class="form-group">
    <div class="row">
        <div class="col-xs-6">
            <label for="templateName">Template</label>

            <select id="templateName" ng-model="properties.TemplateName.PropertyValue" class="form-control">
                @foreach (var viewName in Html.GetViewNames("Hawksearch", @"Hawksearch\.(?<viewName>[\w\s]*)$"))
                {
                    <option value="@viewName"> @viewName.SplitCamelCase()</option>
                }
            </select>
        </div>
    </div>
</div>
- Create a helper class in which you will compare the indexes created in the API and the indexes created in Sitefinity. This will provide the list of indexes which are external to Sitefinity.
using System.Collections.Generic;
using System.IO;
using System.Linq;
using System.Net;
using System.Web.Mvc;
using Hawksearch.Configuration;
using Newtonsoft.Json;

namespace SitefinityWebApp.Search
{
    public static class DesignerHelper
    {
        public static List<string> GetExternalIndexes(this HtmlHelper htmlString, Dictionary<string, string> indexes)
        {
            var indexNames = indexes.Keys.ToList();
            var hawksearchIndexes = GetHawksearchIndexes().FirstOrDefault().Value.ToList();
            var externalIndexes = hawksearchIndexes.Where(hi => !indexNames.Any(hi.EndsWith)).ToList();

            return externalIndexes;
        }

        private static Dictionary<string, List<string>> GetHawksearchIndexes()
        {
            var index = new Dictionary<string, List<string>>();
            var request = InitializeIndexingApi();
            var response = request.GetResponse();

            using (var dataStream = response.GetResponseStream())
            {
                if (dataStream != null)
                {
                    var reader = new StreamReader(dataStream);
                    var responseFromServer = reader.ReadToEnd();
                    index = JsonConvert.DeserializeObject<Dictionary<string, List<string>>>(responseFromServer);
                }
            }

            return index;
        }

        private static HttpWebRequest InitializeIndexingApi()
        {
            var hawksearchHeader = "X-HawkSearch-ApiKey";
            var config = Telerik.Sitefinity.Configuration.Config.Get<HawkSearchConfig>();
            var indexingUrl = config.HawkSearchIndex;
            var apiKey = config.HawkSearchApiKey;
            var request = (HttpWebRequest)WebRequest.Create(indexingUrl);

            request.Headers.Add(hawksearchHeader, apiKey);

            return request;
        }
    }
}
- Create a Custom Model class which inherits from the base SearchModel class.
- Override the GetIndex method of the SearchModel.
using HawksearchWidgets.Mvc.Models.Hawksearch;

namespace SitefinityWebApp.Search
{
    public class CustomSearchModel : SearchModel
    {
       public CustomSearchModel(bool showSearchBox, string indexName, string data, string trackingEvents, Uri requestUrl) : base(showSearchBox, indexName, data, trackingEvents, requestUrl)
        {
        }

        protected override string GetIndex(string indexName)
        {
            var index = base.GetIndex(indexName);

            if (string.IsNullOrWhiteSpace(index))
            {
                index = indexName;
            }

            return index;
        }
    }
}
- Rebind the widget model in the Global.asax → Bootstrapper_Bootstrapped method adding the code below. Change the CustomSearchModel with your model class name.
        protected void Application_Start(object sender, EventArgs e)
        {
            Bootstrapper.Bootstrapped += Bootstrapper_Bootstrapped;
        }

        private void Bootstrapper_Bootstrapped(object sender, EventArgs e)
        {
            FrontendModule.Current.DependencyResolver.Rebind<ISearchModel>().To<CustomSearchModel>();
        }
- Go to pages (your-website-url/Sitefinity/adminapp/pages) and open a page on which you have placed the Hawksearch result widget.
- Open the widget designer and you will see a list of indexes separated by : ‘- External Indexes -’ label. Every index under this label will be external for the current Sitefinity instance.
- Choose the desired index, click save and publish the page.
Multisource indexing: Create external indexing service
Goal
Hawksearch connector exposes an API for notifying external data sources while monitoring their indexing process. This way you can integrate the connector with external data source and modify the indexing flow based on data source indexing outcome. This article will provide information for creating an external indexing service compatible with Hawksearch connector.
Designing the external indexing service
Receiving a request from the Hawksearch connector
The service must expose a POST endpoint, which will receive and object with RequestId and IndexName from the request body.
METHOD: POST
{
  "RequestId": "558ad504-9b2d-4b67-be4f-7ab9ed3028fb",
  "IndexName": "hawksearchindexname.20201020.112252.suffix"
}
The response must follow the HTTP protocol status code semantics.
Sending a request to the Hawksearch connector
When the indexing process is completed, the service must send a PUT request to your-site-domain/hawk/index/status containing the RequestId and the IndexName received from the first request, and Status which notifies if the indexing is successful or failed.
You can set the status to either “successful” or “fail” depending on the indexing result.
METHOD: PUT
{
  "RequestId":"558ad504-9b2d-4b67-be4f-7ab9ed3028fb",
  "IndexName":"hawksearchindexname.20201020.112252.suffix",
  "Action":"all",
  "Status":"successful",
  "ObjectType":"status",
  "Message":"Rebuild Hawksearch Index finished successfully"
}
RequestId, IndexName and Status properties are required.
Use different Hawksearch engines in Sitefinity multisite
Goal
With the release of Sitefinity 13.3 and site-specific settings, you can use different engines for different sites in a multi-site environment.
This article will provide information and a sample with which you can achieve this.
In this example, the engines will differ only for their HawkSearchApiKey and HawkSearchClientId, and we will set site-specific values for these two properties.
Set Site-Specific Settings
- Open Administration → Settings → Advanced (your-site-domain/Sitefinity/Administration/Settings/Advanced
- Open the Hawksearch tab.
- Copy the HawkSearchApiKey property path

- Copy the HawkSearchClientId property path

- Open the SiteSettings → SiteSpecificProperties tab in Advanced Settings
- Click Create new.
- In Path, enter the copied value.
- Save your changes.
- Restart your application.
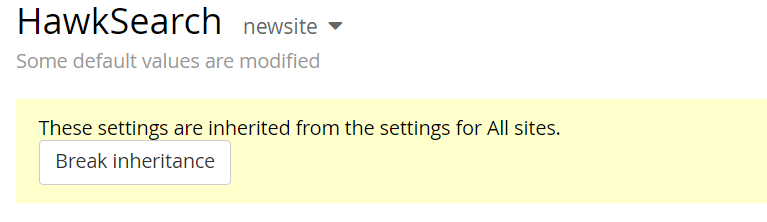
- Go back to the Hawksearch tab.
- Select the desired Site that you want to have site-specific configurations.
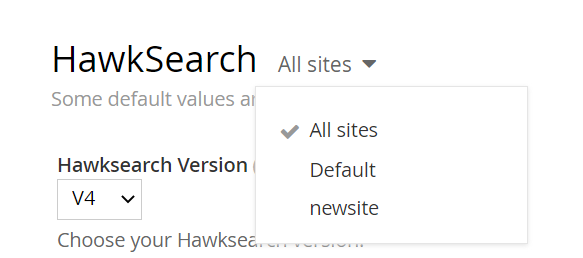
- Click the Break Inheritance button
- Add values for the exposed fields
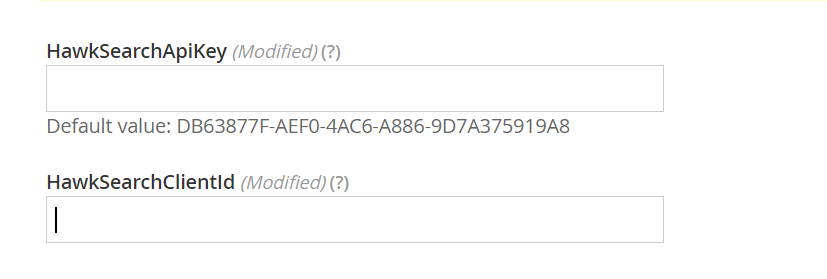
- Click Save Changes.
Link to official site-specific settings documentation - Site-specific settings - Sitefinity CMS Setup and maintenance
Extend the Hawksearch Service
In order to use the site-specific settings we need to override InitializeClient method of the Hawksearch service and use the site-specific API. As we do not have access to the Context in RemoveDocuments method we should override it and get the current site by the index name.
using System.Collections.Generic;
using System.Linq;
using Hawksearch.Configuration;
using Hawksearch.SDK;
using Hawksearch.Search;
using Telerik.Sitefinity.Configuration;
using Telerik.Sitefinity.Multisite;
using Telerik.Sitefinity.Publishing;
using Telerik.Sitefinity.Publishing.Configuration;
using Telerik.Sitefinity.Publishing.Model;
using Telerik.Sitefinity.Services;
using Telerik.Sitefinity.Services.Search.Data;

namespace SitefinityWebApp.Custom
{
    public class CustomSearchService : HawksearchService
    {
        private ISite site;

        public override void DeleteIndex(string name)
        {
            this.site = SystemManager.CurrentContext.CurrentSite;

            base.DeleteIndex(name);
        }

        public override void RemoveDocuments(string indexName, IEnumerable<IDocument> documents)
        {
            this.site = this.GetSiteFromIndex(indexName);

            base.RemoveDocuments(indexName, documents);
        }

        protected override IHawksearchClient InitializeClient()
        {
            using (new SiteRegion(this.site))
            {
                this.HawkConfig = Config.Get<HawkSearchConfig>();

                var enableIndexTraceLog = this.HawkConfig.EnableIndexTraceLog;
                var enableSearchTraceLog = this.HawkConfig.EnableSearchTraceLog;
                var client = new HawksearchClient(this.HawkConfig.HawkSearchBaseAPI,
                    this.HawkConfig.HawkSearchIndex,
                    this.HawkConfig.HierarchyUrl,
                    this.HawkConfig.HawkSearchSearchingAPI,
                    this.HawkConfig.AutocompleteUrl,
                    this.HawkConfig.HawkSearchClientId,
                    this.HawkConfig.HawkSearchApiKey,
                    enableIndexTraceLog,
                    enableSearchTraceLog,
                    this.RequestLog,
                    this.ResponseLog);

                return client;
            }
        }

        private ISite GetSiteFromIndex(string indexName)
        {
            var manager = PublishingManager.GetManager(PublishingConfig.SearchProviderName);
            var query = manager.GetPipeSettings<SearchIndexPipeSettings>();
            var pipeSettings = query.Where(p => p.IsActive == true && p.IsInbound == false).ToList();
            var sites = SystemManager.CurrentContext.GetSites();
            var pointLinks = manager.Provider.GetSiteItemLinks().ToList();

            foreach (var site in sites)
            {
                var links = pointLinks.Where(l => l.SiteId == site.Id).Select(l => l.ItemId).ToList();
                var indexPipeSettings = pipeSettings.FirstOrDefault(p => (p.PublishingPoint.IsSharedWithAllSites || links.Contains(p.PublishingPoint.Id)) && p.CatalogName == indexName);

                if (indexPipeSettings != null)
                {
                    return site;
                }
            }

            return SystemManager.CurrentContext.CurrentSite;
        }
    }
}
Updated 12 months ago