
Working with the AI Multiplier
Instructions match to QuickStart data
As with other sections, the data and examples provided are designed to be used with the data file provided in the QuickStart section. If you are using your own dataset, then adjust the API calls accordingly.
What is the AI Multiplier?
The AI Multiplier is a powerful feature that boosts search results based on behavior on your website. This is like any other boost rule in HawkSearch - it's just that in this case, the boost is added based on site activity. There are four AI Multipliers:

The Learning Search Multiplier looks at what results are being clicked on your search results. If people are searching for and clicking on a product frequently, that product will get a boost and will appear higher in the next search results. The Boost for Recommended Items refers to individual boost based on a specific person's activity - namely a purchase. If HawkSearch tracks a purchase by an individual of a product on your site, the next time they visit your site, that product will be boosted. The Orders and Add2Carts multipliers are similar boost results based on those events.
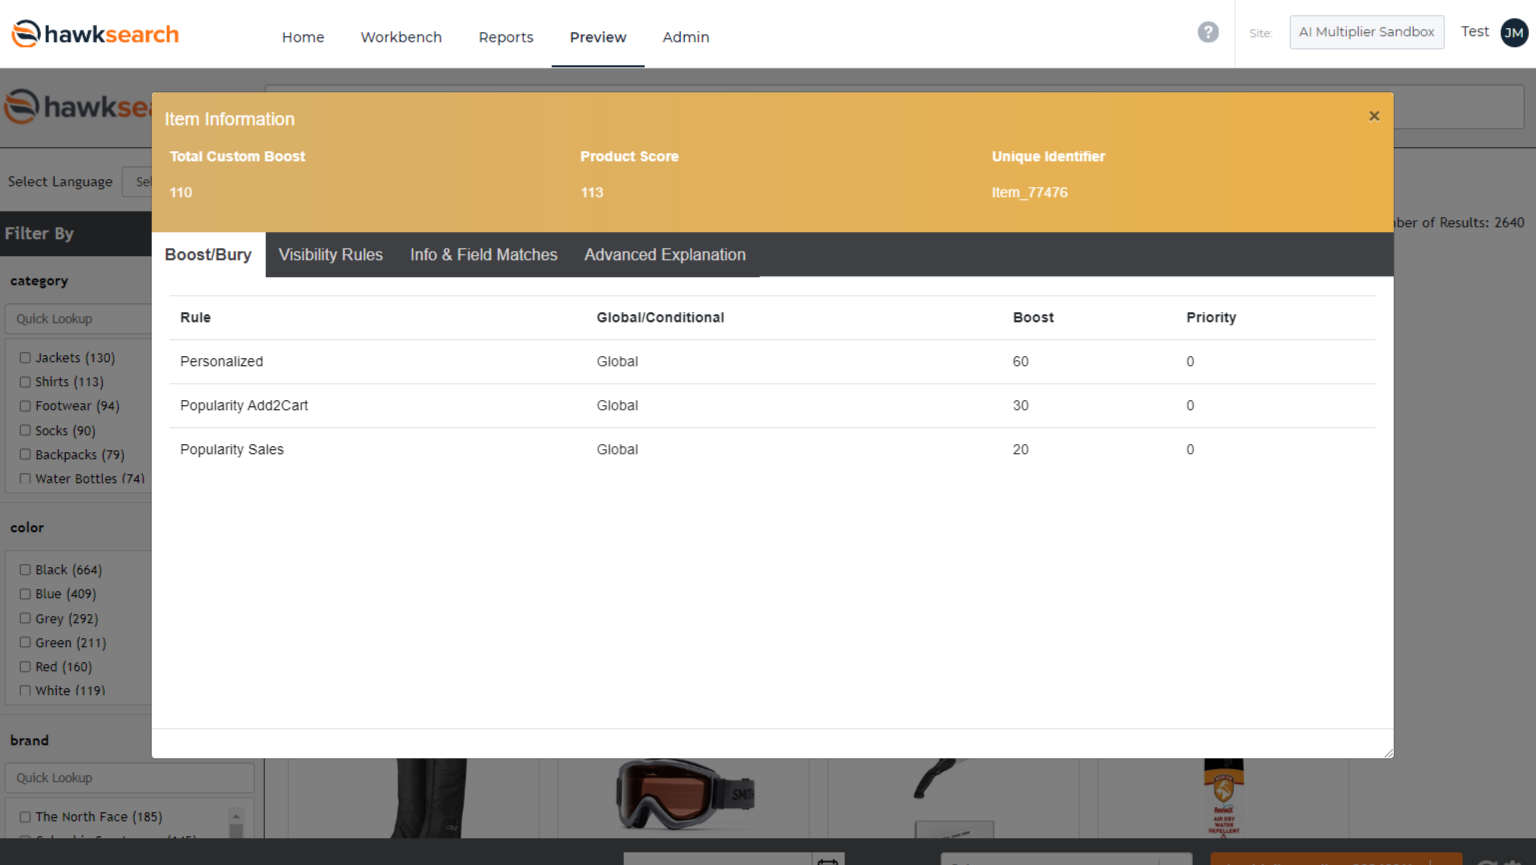
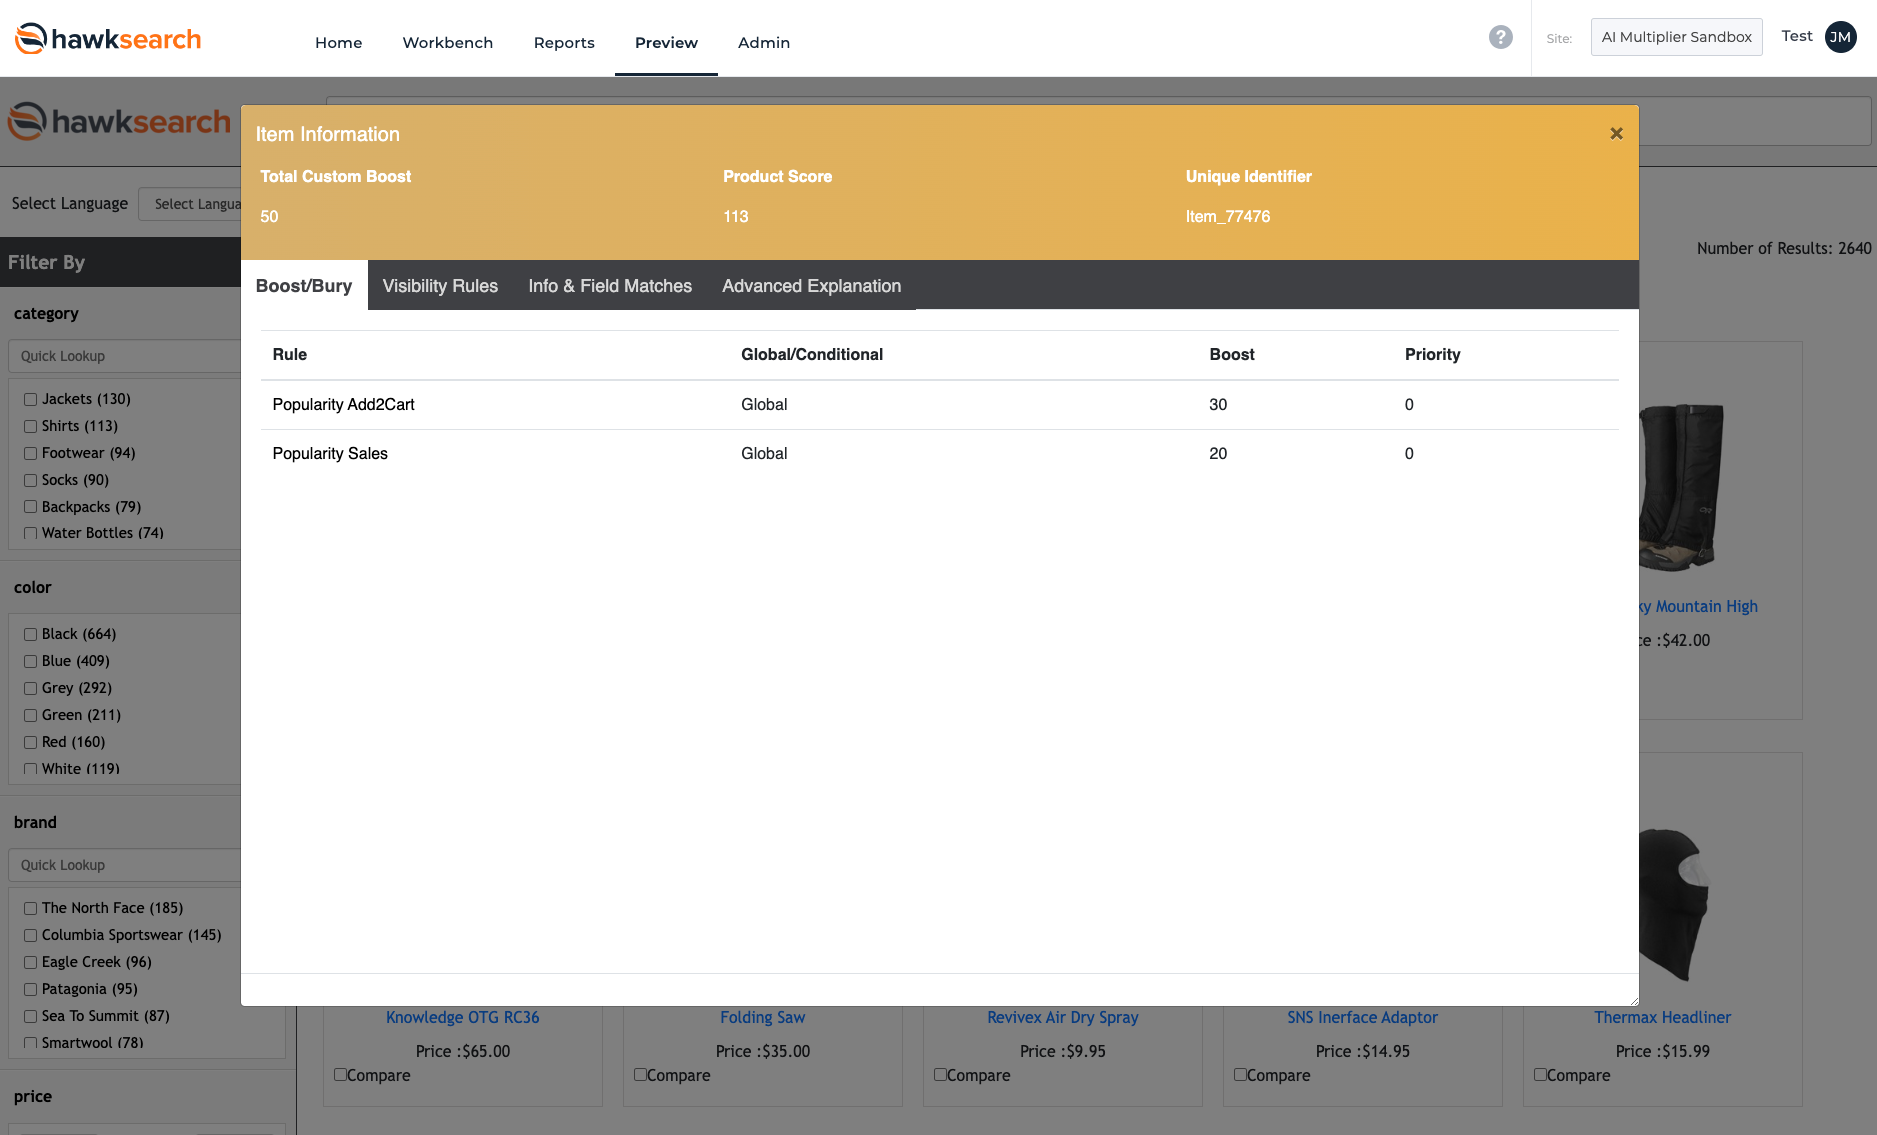
In order to see the impact of these actions, you can go to the Preview screen and view the boost details for each product. This will break down the impact of each AI Multiplier rule:
Before you get started
There are a number of moving parts to the AI Multiplier capability and this feature only works in Production and Test environments. All other documentation in the QuickStart section of our Developer Portal are on our Dev Environment, but this must run in test. If you are interested in testing this, please reach out to your HawkSearch project manager to copy your engine to our Test environment.
These are the components of the AI Multiplier
- Settings in HawkSearch - see the screenshot above - make sure you select some options
- The API tracking endpoints - these will typically be built into your website, but in this documentation we'll mimic the activity using Postman. These are written to MongoDB
- The Summary Jobs - these run each hour in MongoDB (keep this in mind during testing) to aggregate activity
- The Harness - used in personalization strategy - it performs further machine learning processes focused on individual behavior. This is performed each night.
- Rebuild All API - if you are not creating a new index and reindexing each night for example, then you should run the Rebuild All API to get the machine learning results from Mongo and the Harness to update your index with the appropriate boost values
Testing this functionality can be challenge as you try to mimic site behavior and considering the automated processing each our and each night - please reach out to your HawkSearch contact to help you with this process.
Just the basics are highlighted here
There are additional variables and options you can include in your tracking. This documentation is to provide the basic tracking to give you an idea of how the feature works.
Learning Search Multiplier
The Learning Search Multiplier is determined based on search and click activity. It is critical though to start with a trackingId to connect your API update to tracking information already captured in HawkSearch.
Step 1: Get the TrackingId
You can run this in Postman just like the other QuickStart processes.
POST

Header

X-HawkSearch-ApiKey

https://searchapi-test.hawksearch.net/api/v2/search

{

	"ClientGuid": "xxxxx",

	"IndexName": "xxx.xxx.xxx",

	"Keyword": "xxxxxxxxxx"

}
| Variable | Info |
|---|---|
| X-HawkSearch-ApiKey | This is the same API key you used in the other QuickStart guides - you need the value from your Test server which may not the be the same as your dev instance |
| Endpoint | Note that the endpoint is on the Test environment |
| ClientGuid | Same as rest of QuickStart |
| IndexName | Same as rest of QuickStart |
| Keyword | The actual keyword you want to search for, in this case "Clem Hat" |
Look at the search results in Postman and search for the TrackingId - it is a GUID - you need this to now track this request (the search above by default does not track search activity).
Step 2: Base64 encode the Search Call
The JSON below should be encoded so you can send it in the actual tracking API. You can use any tool for Base64 encoding, for example https://www.base64encode.org/
{

	"TypeId": 1,

	"TrackingId": "<<returned from search result>>",

	"QueryId":  "<<generate yourself>>",

	"Qs":  "Clem Hat"

}
| Variable | Info |
|---|---|
| The TypeId | Indicates a keyword search |
| TrackingId | This is critical - it must be the Id returned in your first search result |
| QueryId | This must follow a GUID standard - it can be generated here for example: https://www.uuidgenerator.net/guid |
| Qs | The actual query - since we're using the QuickStart data, Clem Hat is a product that will return a result |
You should get a result that looks something like:
eyAgCgoiVHlwZUlkIjogMSwgIAoKIlRyYWNraW5nSWQiOiAiN2Q0MWMyZmQtZDNlZC00MmY3LWIyN2YtOWQ3NTk1MTJhZjI4IiwgIAoKIlF1ZXJ5SWQiOiAgIjI1ZTc4MTdlLTlkZjMtNDNjYS04MGQwLTI4NGFhNzM2OWJiNSIsIAoKIlFzIjogICJDbGVtIEhhdCIgCgp9
Step 3: Send the Event Data through the Tracking API
POST

Header

X-HawkSearch-ApiKey

https://tracking-test.hawksearch.net/api/trackevent

{

	"ClientGuid":"<<from your test account>>",

	"VisitId":"<<generate yourself>>",

	"VisitorId":"<<generate yourself>>",

	"EventType":"Search",

	"EventData": "<<from the base64 encoding above>>"

}
| Variable | Info |
|---|---|
| ClientGuid | Same as other API calls |
| VisitId | This must follow a GUID standard - it can be generated here for example: https://www.uuidgenerator.net/guid. This will be used again below. |
| VisitorId | This must follow a GUID standard - it can be generated here for example: https://www.uuidgenerator.net/guid. This is only required if you want to test personalization. This can be used again below. |
| EventType | Indicates the type of tracking |
| EventData | From the Base64 encoding explained above |
Click Tracking
The click tracking data will help indicate how much to increase the boost for the Learning Search functionality.
Step 1: Base64 Encode the Click Tracking Data
{

	"ElementNo": 15,

	"TrackingId": "<<from the original search result>>",

	"UniqueId":  "Item_77476",

	"Url":  "https://preview-dev.hawksearch.net/elasticdemo/details?itemid=Item_77476"

}
| Variable | Info |
|---|---|
| ElementNo | The result number where the item was returned in the search you performed above - if you are for example returning 12 results at a time through pagination, and the result was 3 on the next screen, then the ElementNo is 15. |
| TrackingId | This is critical - it must be the same value as above call for Search event |
| UniqueId | The value above is based on QuickStart data |
| Url | The value above is based on QuickStart data |
After running that JSON through Base64 encoding you should a similar result to above.
Step 2: Send the Event Data through the Tracking API
POST

Header

X-HawkSearch-ApiKey (from your TEST account)

https://tracking-test.hawksearch.net/api/trackevent

{

	"ClientGuid":"<<from account>>",

	"VisitId":"<<should be same as search>>",

	"VisitorId":" <<should be same as search>> ",

	"EventType":"Click",

	"EventData": "<<from base64 encoding>>"

}
Add2Cart Tracking
When a site visitor adds an item to their shopping cart, this call can be made.
Step 1: Base64 encode the Add2Cart Data
{

 	"UniqueId":"Item_77476",

 	"Price":24.99,

 	"Quantity":1,

 	"Currency":"USD"

}
| Variable | Info |
|---|---|
| UniqueId | This is the ID in the import file for QuickStart for the "Clem Hat" - if not using QuickStart data, then whatever is the unique field in your HawkSearch index |
| Price | Same as UniqueId above |
| Quantity | For basic testing we use "1" |
| Currency | Standard field |
The results of the Base64 encoding will be similar to above
Step2: Send the Event Data through the Tracking API
POST

Header

X-HawkSearch-ApiKey (from your TEST account)

https://tracking-test.hawksearch.net/api/trackevent

{

	"ClientGuid":"<<from account>>",

	"VisitId":"<<should match above call>>",

	"VisitorId":" <<should match above call>>",

	"EventType":"Add2Cart",

	"EventData": "<<from base64 encoding above>>"

}
PageLoad Tracking
This is a generic event capture which relates to the personalization strategy. It’s different from the click event because there could be scenarios when HawkSearch doesn’t know a click occurs. This call is added here because the personalization requires both the PageLoad and Sale api calls to work.
Step1: Base64 Encode Tracking Data
{

	"PageTypeId":"1",

	"RequestPath":"/elasticdemo/details?itemid=Item_77476",

	"UniqueId":"Item_76463"

}
| Variable | Info |
|---|---|
| PageTypeId | Options are highlighted here: https://developerdocs.hawksearch.com/docs/event-tracking-api#page-load-event |
| RequestPath | The URL of requested page (this could be helpful for analysis) |
Step2: Send Event Data through the Tracking API
POST

Header

X-HawkSearch-ApiKey (from your TEST account)

https://tracking-test.hawksearch.net/api/trackevent

{

	"ClientGuid":"<<from account>>",

	"VisitId":"<<should match above call>>",

	"VisitorId":" <<should match above call>>",

	"EventType":"PageLoad",

	"EventData": " <<from base64 encoding above>>"

}
Sale Event Tracking
Step 1: Base64 Encode the Event Data
This is tracked when the item is purchased
{

	"Total":24.99,

	"OrderNo":"11223344",

	"Currency":"USD",

	"ItemList":\[

	{

		"uniqueId":"Item_77476",

		"ItemPrice":24.99,

		"quantity":1

		} ]

}
| Variable | Info |
|---|---|
| Total | Note that multiple items can be listed in the ItemList so the total should be included at the top |
| OrderNo | This would be from your ecommerce platform. It can help in testing to confirm API calls |
Step 2: Send the Event Data through the Tracking API
POST

Header

X-HawkSearch-ApiKey (from your TEST account)

https://tracking-test.hawksearch.net/api/trackevent

{

	"ClientGuid":"<<from account>>",

	"VisitId":"<<should match above call>>",

	"VisitorId":" <<should match above call>>",

	"EventType":" Sale ",

	"EventData": " <<from base64 encoding above>>"

}
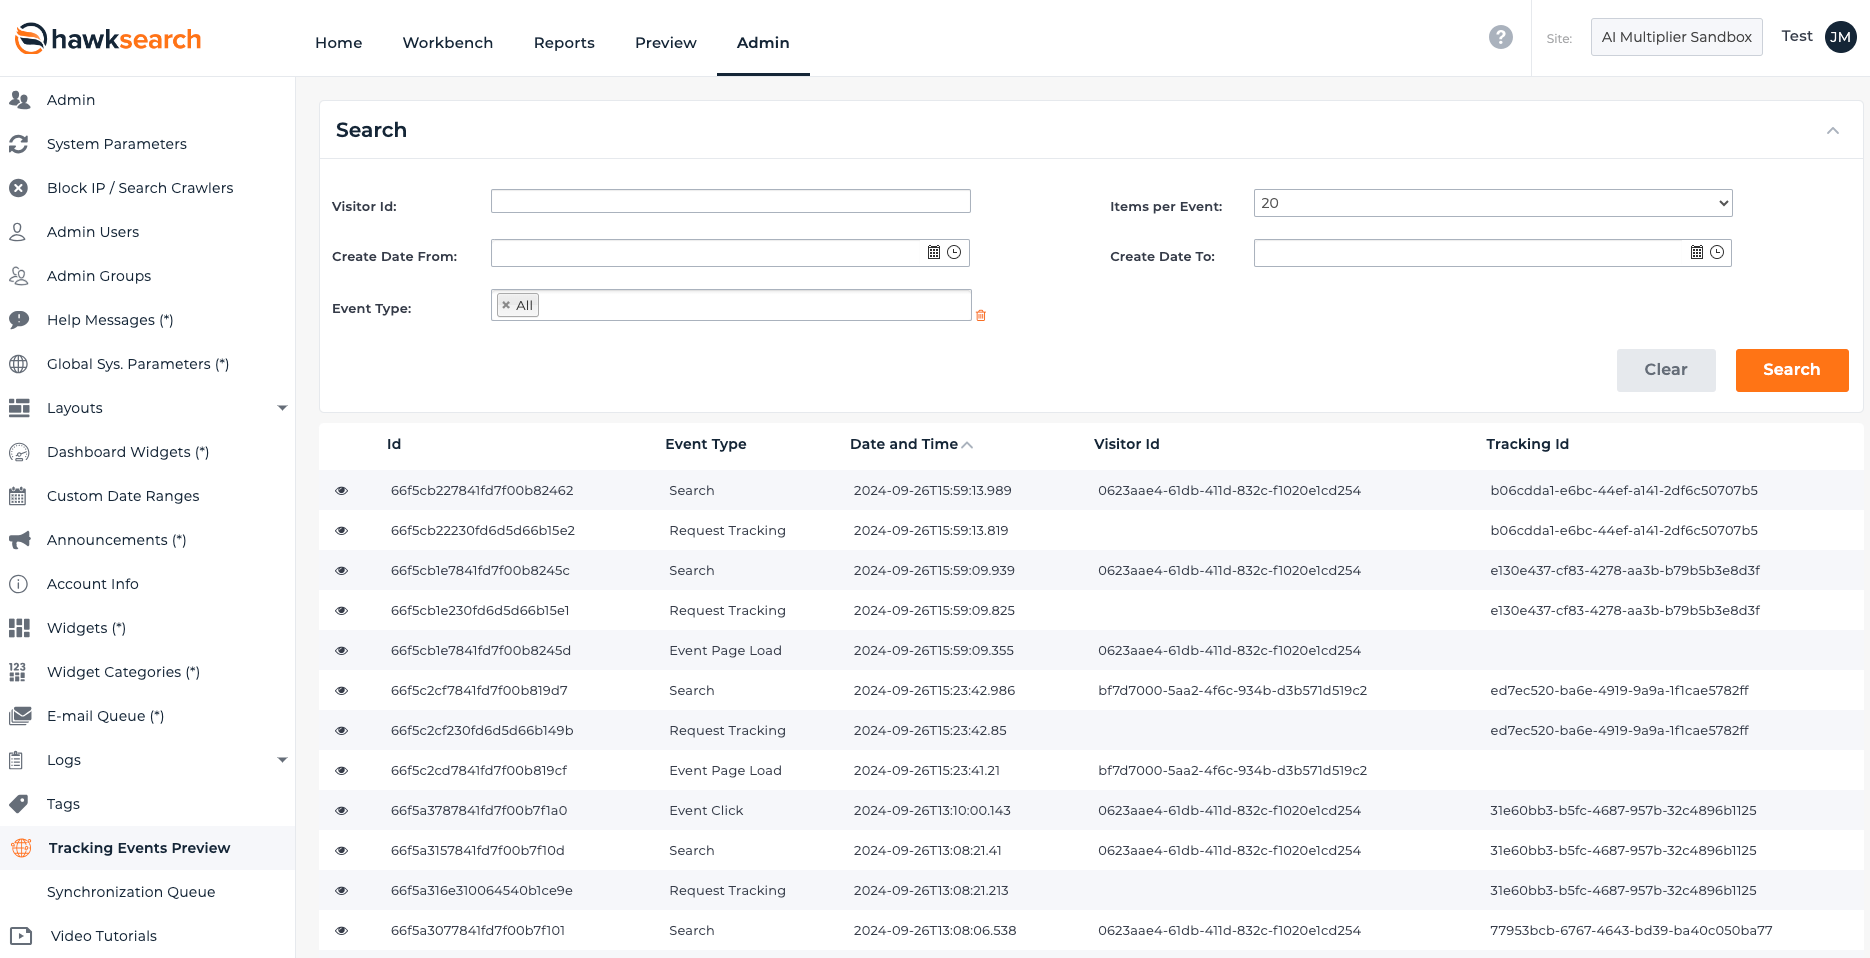
Ensure Data was captured
All API calls are captured in the Admin section of HawkSearch: https://test.hawksearch.net/admin/trackingPreview.aspx
You can inspect the details of each call by clicking the eye icon on the left of each call.
Wait for Processing
Two processes need to happen for the results to be processed:
- Raw tracking info for Learning Search, Add2Cart, and Sales are aggregated (this happens every hour)
- Personalized data tracking data is sent to another system called the harness (this happens every night)
Make sure you speak with your HawkSearch project manager to make sure these processes are configured correctly.
Connect Machine Learning to your Index
Then run this API calls to call the machine learning that has been aggregated and processed into your index. If you are doing a full reindex with new data and a new index, then you can run the standard indexing API call (this is included in that call). If you have not changed your index, then run this call:
POST

Header

X-HawkSearch-ApiKey (from your TEST account)

https://indexing-test.hawksearch.net/api/v2/indexing/rebuild-all

{

	"IndexName": "xxx.xxx.xxx"

}
Testing the results
The preview screen in the HawkSearch tool will show you the boost results through Machine Learning along with any other boost rules you may have created.
Download Test API Tracking Data
We have created a CSV which you can use in a Postman script to speed up your testing process. Note however, that the Search and the Click events can not be pre-created since they require a TrackingId that is generated by your index. However, the rest of the information will save you considerable time.
You can download the file here: https://hawksearch-sales.demos.hawksearch.com/sales/quickstart-sandbox/AI_Multiplier_Tracking_Data.csv
Note: you will need to generate some of the EventData as explained above.
You can run the Postman script like the rest of the examples in the QuickStart section:
POST

Header

X-HawkSearch-ApiKey

https://tracking-test.hawksearch.net/api/trackevent
{

	"ClientGuid":"{{ClientGuid}}",

	"VisitId":"{{VisitId}}",

	"VisitorId":"{{VisitorId}}",

  "EventType":"{{EventType}}",

	"EventData": "{{EventData}}"

}
Updated about 1 year ago